How A Mobile App Grows Your Business
Have you ever thought about what makes some businesses more successful than others? It’s their accessibility and ease of interaction with customers. And what better way to achieve this than with a mobile app? In today’s world, where smartphones are a key part of our lives, an app can be your direct connection to customers, accessible anytime, anywhere.
Key benefits of having an app for your business:
- Be Visible All the Time: Your business stays visible on your clients’ phones, keeping you in their minds.
- Easy Access for Customers: An app makes it easy for people to find and use your services or buy your products.
- Stand Out from the Crowd: Stand out in a crowded market with your unique app. It’s a sign of a modern, customer-centric business.
- Build Stronger Customer Relationships: With an app, you can easily keep in touch with your clients, offer promotions, and get valuable feedback.
And the best part? You don’t need to be a tech expert to create an app. It’s simpler than you think, and we’re here to guide you through this process.
The Magic of Progressive Web Apps (PWAs)
Imagine using a website like an app. That’s a Progressive Web App (PWA). You can use the PWA right in your browser or install it for easy access on any device without the need for downloads from the store.
Advantages of Progressive Web Apps (PWAs):
- Save Money: PWAs don’t need different versions for iPhones and Androids, so they cost less to make. This is good for new businesses or if you have a limited budget.
- Easy Updates: Updating a PWA is just like updating a website. Users get the latest version without having to download anything.
- Simple to Add: Your customers can put your PWA on their home screen easily, no need to go through an app store.
- Works on All Devices: PWAs work on phones, tablets, and computers. So, more people can use your app, no matter what device they have.
- Fits Every Screen: PWAs change the size to fit any screen, big or small. Your app will always look good and work well.
- Quick and Light: PWAs load fast and don’t use much data. This means a better user experience, even if their internet is slow.
- Safe and Secure: PWAs are secure because they use HTTPS, which means the connection between the user and the app is encrypted and secure. This keeps the information safe and builds trust.
Choosing a PWA for your business means you’re picking a solution that’s easy to handle, budget-friendly, and good for reaching more people. PWAs are a smart way to make sure your business is easy to find and safe online.
Simple Steps to Launch Your First App Successfully
Let’s start setting up your app with some basic things: its name, theme, and logo. It’s important to choose these carefully but remember, you can always change them later.
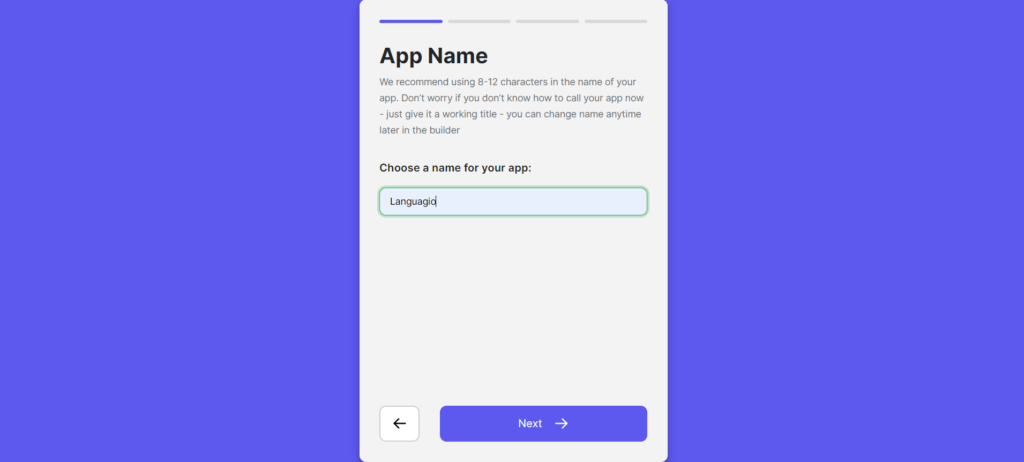
Step 1: Choosing a Good Name.
Your app’s name is the first thing people notice. It needs to be easy to remember, easy to pronounce, and should reflect what your app is about. Choose a name that connects with your customers and stands out in the app market.
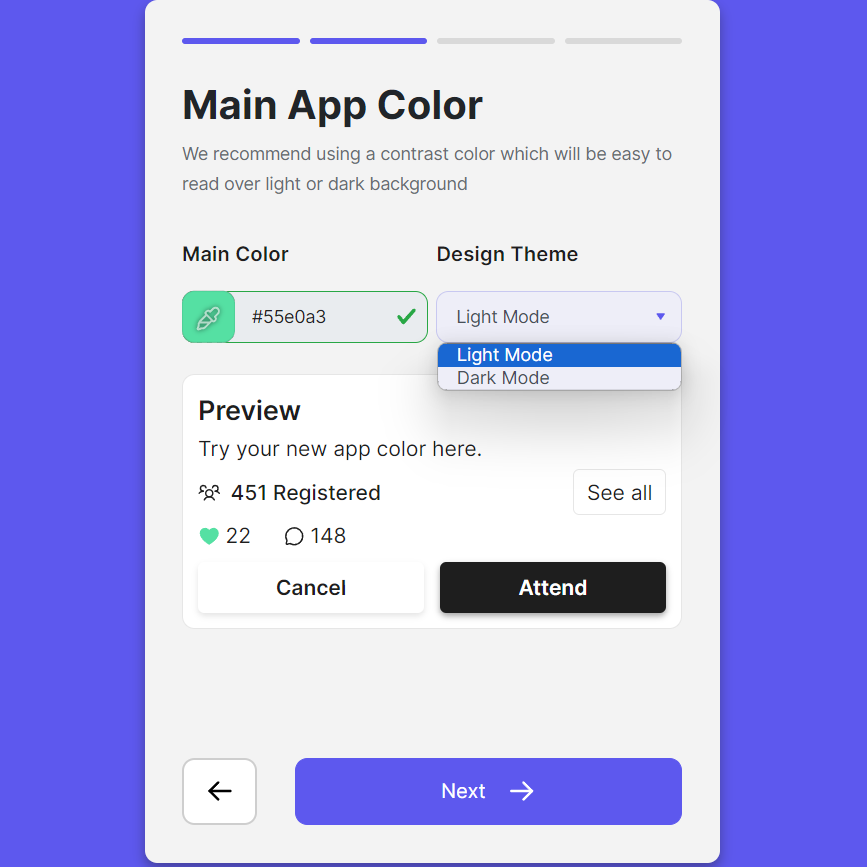
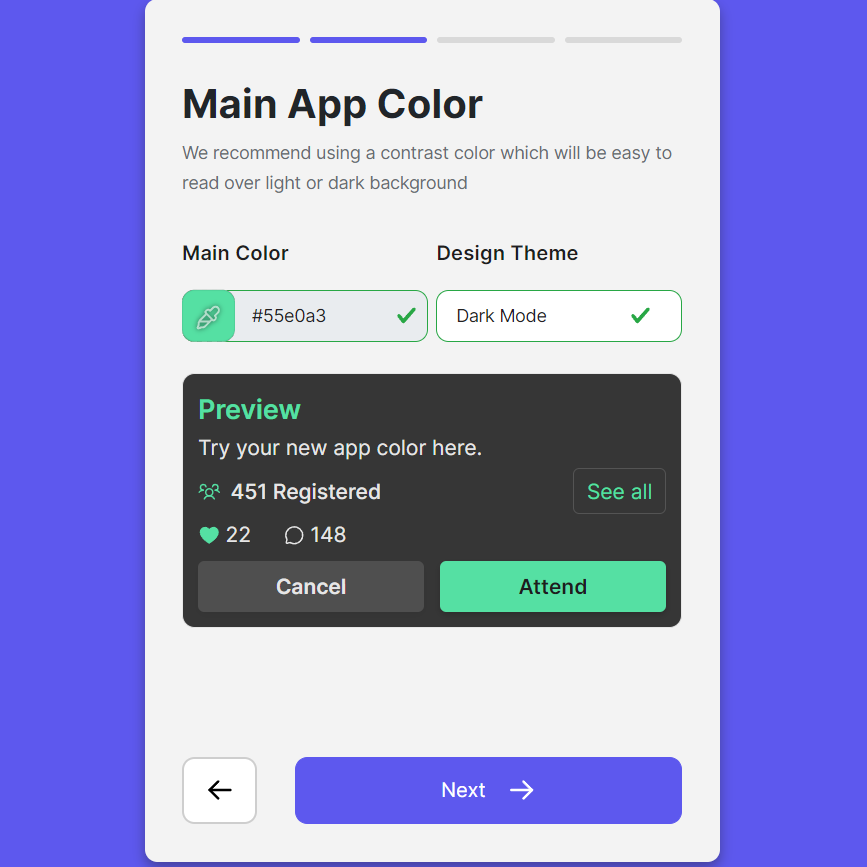
Step 2: Picking the Color and Theme.
The color and look of your app are important. Pick an accent color that fits your brand and is nice for the users. Also, decide between a light or dark theme. You can see how they look right below.
Step 3: Uploading a Logo or Choosing an Emoji.
Your logo is a visual anchor for your brand. If you don’t have one yet, no worries! We provide many emojis that can be a temporary logo. This way, you can still give your app a unique and recognizable face until you decide on a permanent logo.
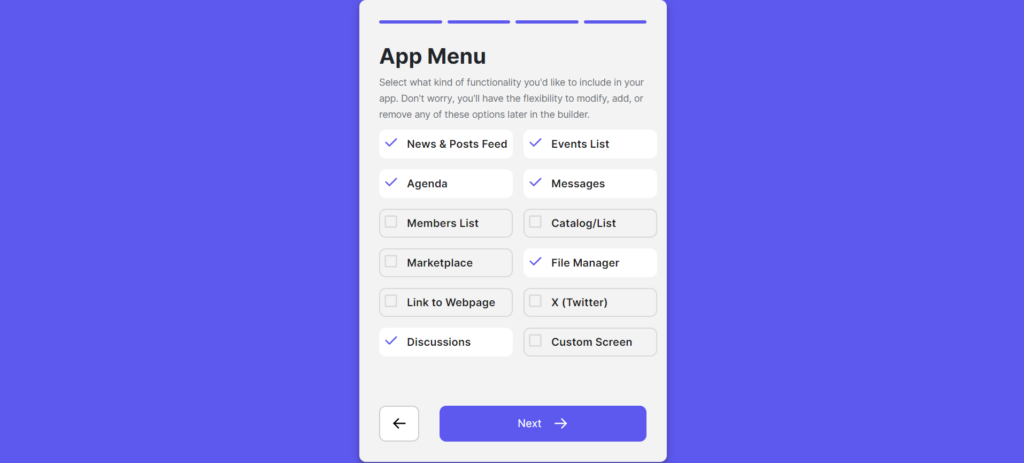
Step 4: Setting Up Your App Menu.
The menu is like a list of features your app offers. You can choose to have events, a marketplace, discussions, messages, and more. Just pick what you want in your app. And don’t worry, you can add or remove these features anytime later.
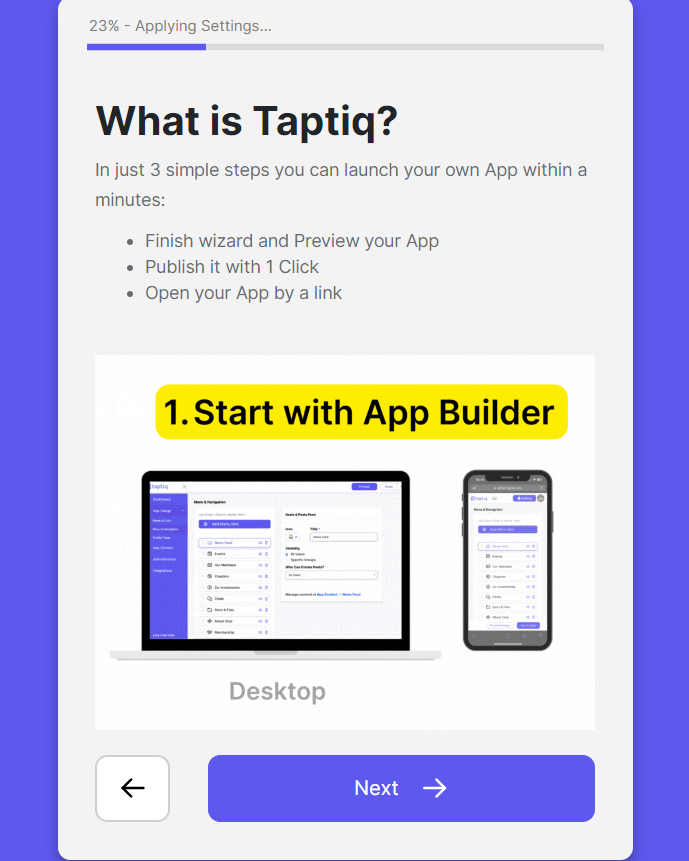
Now that we’ve finished the basic setup of your app and while it’s processing, you have the perfect opportunity to explore some useful tips on working with the App Builder. In the next part, we’ll dive into all its features, helping you fully understand and utilize its capabilities.
Unlock the Secrets of the App Builder
In this part, we’ll go through each section of the App Builder and its features. You’ll learn about the easy-to-use design area and the tools that help your app work well. We’ll show you everything to make using this platform simple and fun, helping you create an amazing app.
Top Menu

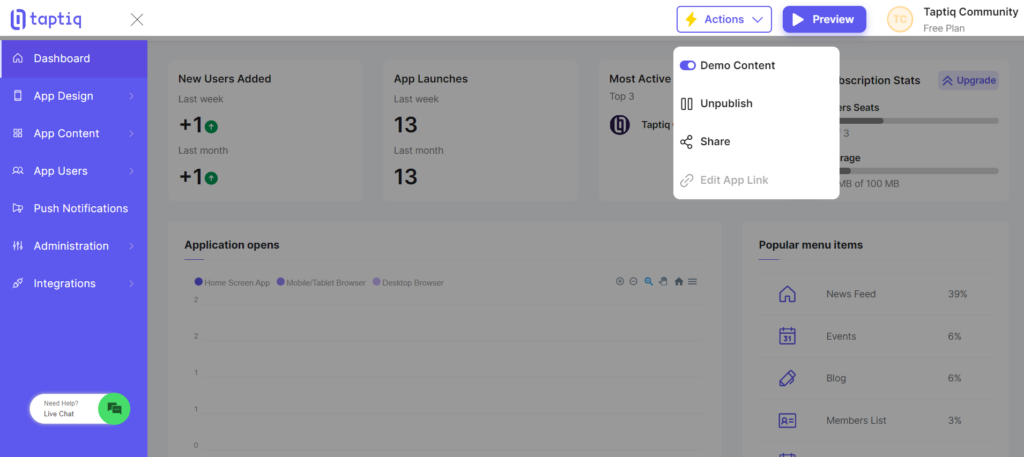
In the App Builder, the top menu is your primary control center. Here’s what you can find:
- Demo Content: Use pre-made content to visualize your app’s look and functionality before adding your own (moves to Actions after you turn it off for the first time).
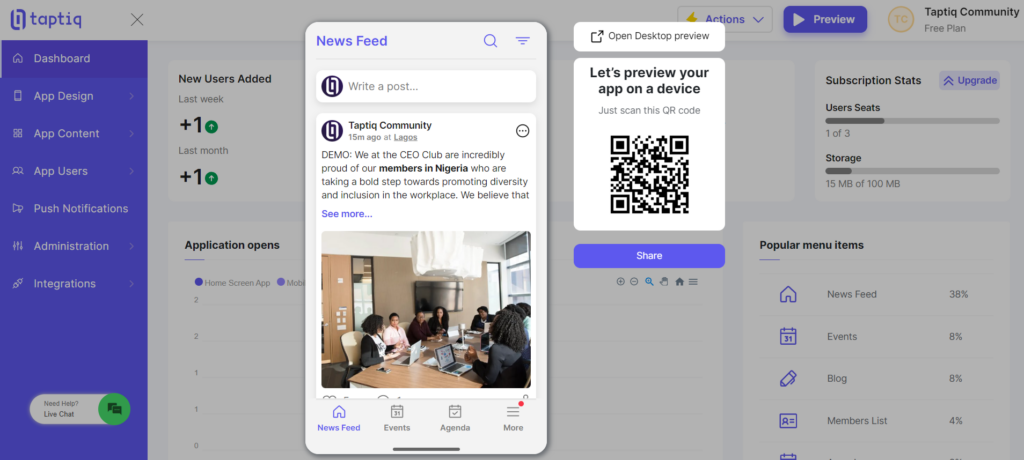
- Preview: Clicking this lets you see the app as it is right now, showing you exactly what users will see. It’s a great way to check your progress.
Also, there’s a button called Actions:
- Demo Content: Use pre-made content to visualize your app’s look and functionality before adding your own.
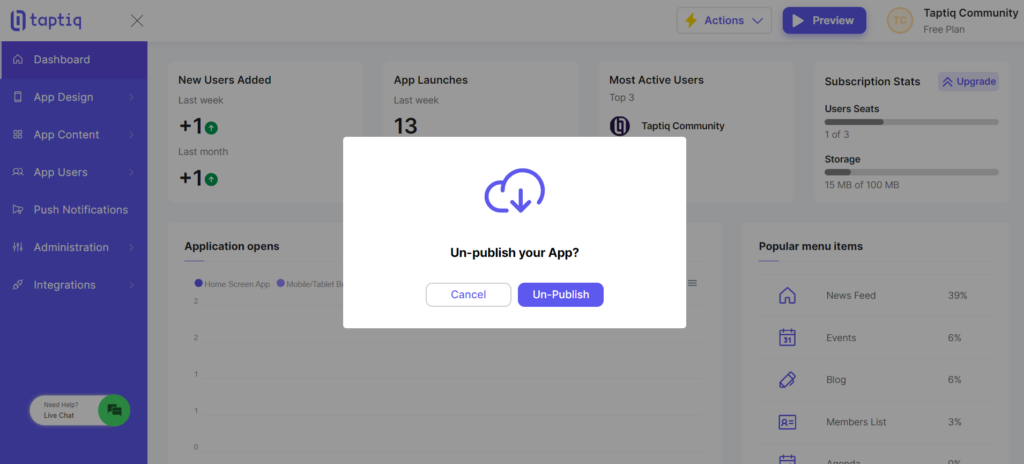
- Publish App / Unpublish App: Change your app’s availability to users. Publish to make it live or unpublish for updates.
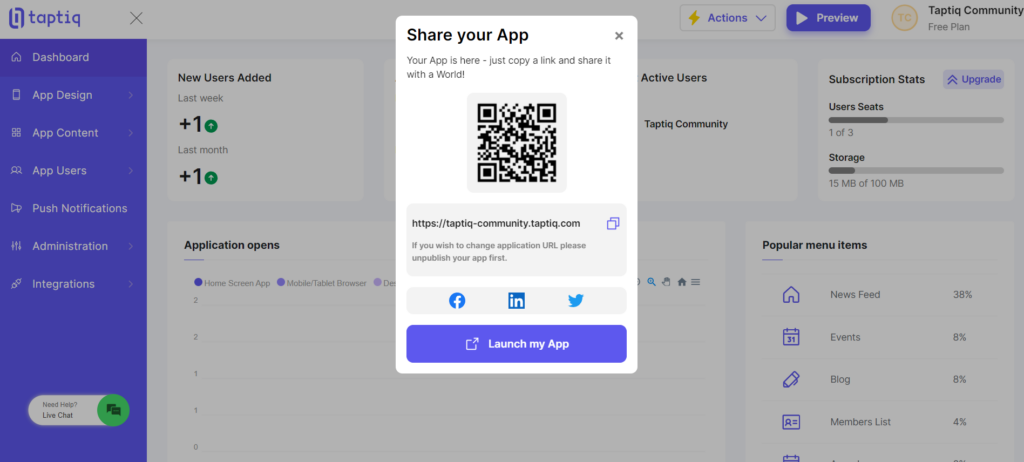
- Share (Only for Published Apps): Once your app is published, you can share it. Options include scanning a QR code, copying a link, or sharing directly on social media.
- Edit App Link (Only Available for Unpublished Apps and paid subscriptions): Modify your app’s link name before making it public.

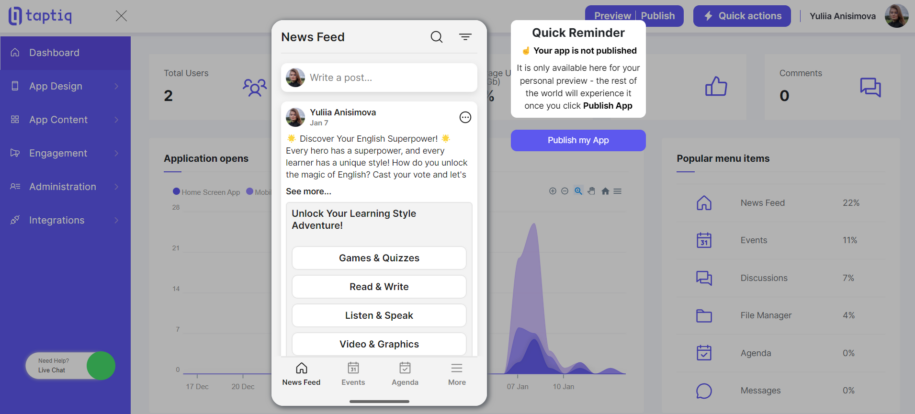
Dashboard
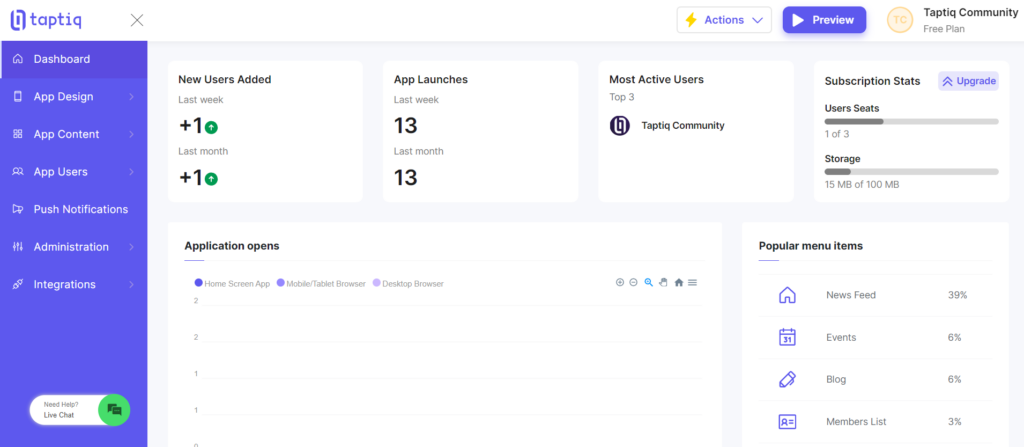
Your dashboard in the App Builder is where you see all the important statistics that matter for your app:
- New Users Added: See how many new users registered in your app last week and month.
- App Launches: Show the number of times users opened your app last week and month.
- Top 3 Most Active Users: See which users are the most engaged and active within your app. This information allows you to reward top users or get their feedback.
- Subscription Stats: Users Seats – see how many users you have and the number of available users according to your plan. Storage – check how much storage you’re currently using and how much is left. Also, this section allows you to upgrade your plan if needed.
- Application opens: There’s a diagram that breaks down app usage across desktop, browser, and mobile.
- Popular menu items: Find out which parts of your app are the most popular with your users to focus efforts on what they like and need the most.
This dashboard is your go-to place for understanding how your app is performing and where to focus your efforts for improvement.
App Design
App Design is about making your app good-looking and easy to use for everyone. Ready to make your app stand out? We’ll show you how to give it a style users will love.
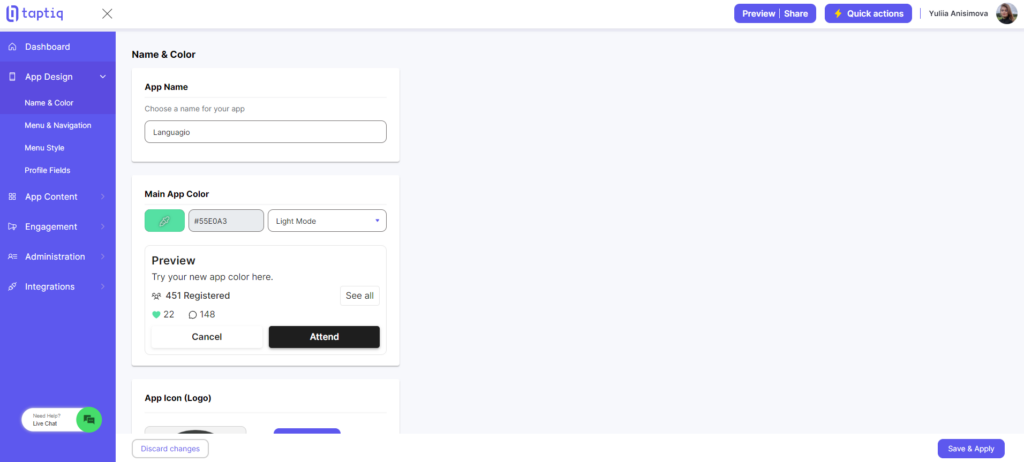
Name & Color:
- Change App Name: Update the name to fit your brand.
- Choose Main Color: Select a color that represents your brand and appeals to users.
- Update Logo: Easily switch out your logo.
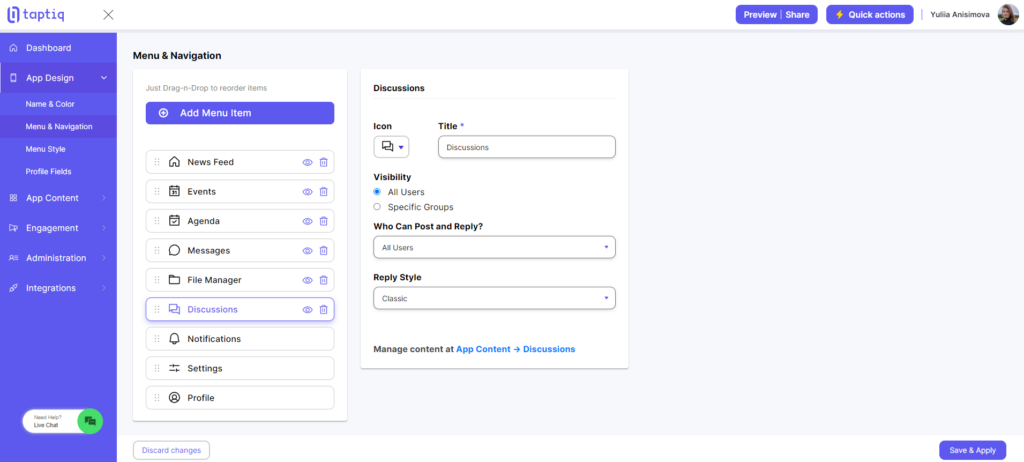
Menu & Navigation:
- Customize Menu Items: Add, remove, or rearrange menu items as needed.
- Wide Range of Features: Access a variety of features like a marketplace, events, discussions, etc. See the full list under ‘Add Menu Item’.
- Icon and Title Customization: Change icons and titles for each menu item for better recognition.
- Control Visibility: Decide who sees what in your app. Set visibility for all users or specific groups (group management covered later).
- Specific Permissions for Each Feature:
- Messages: Control who users can chat with.
- Discussions: Manage posting and replying permissions.
- News Feed: Determine who can create posts.
- Catalog: Choose between card or list styles.
- Marketplace: Handle all sales-related settings.
- Members List: Decide who appears in the list.
Important Note: Before launching your app, it’s crucial to check and confirm the settings of the permissions for each menu item. Ensuring these are correctly set will help your app function as intended and provide the best experience for your users.
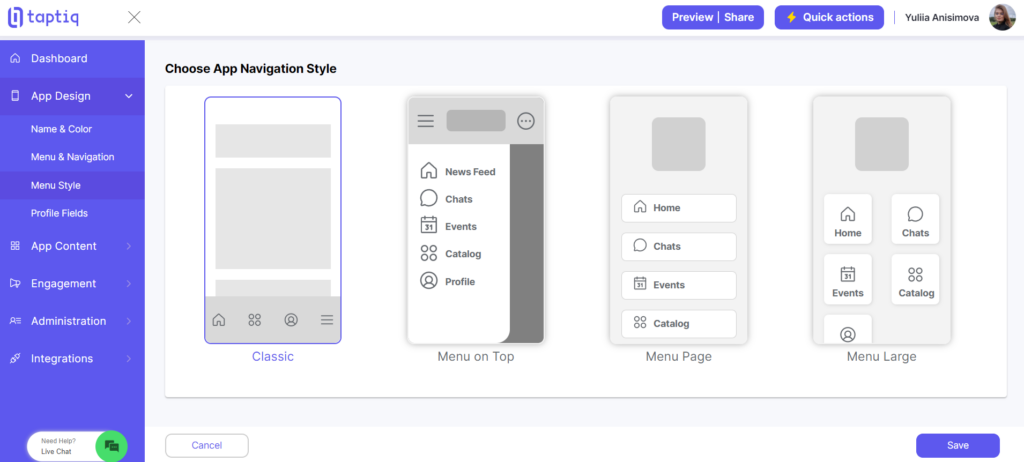
Menu Style
In the Menu Style section, you can pick the look of your app’s menu. We offer four popular design options to match your app’s style. Whether you prefer a simple modern look or a classic style, each choice makes your menu visually appealing and a good match for your app.
Now that we’ve finished setting up the App Design, let’s move on to the next step: App Content. This is where we add the exciting details that bring your app to life.
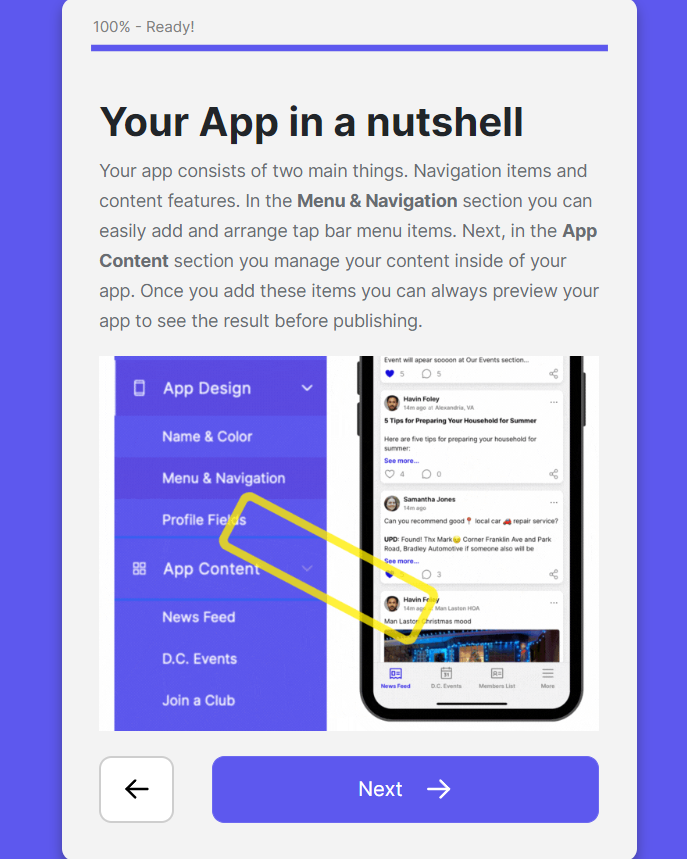
App Content
In the App Content area, you have the tools to add and manage specific information for each menu item in your app. Whether adding speakers and event details, posting news updates, or listing products in the marketplace, this section is key to customizing content for each aspect of your app. Let’s explore all the opportunities to make your app useful and interesting for your users.
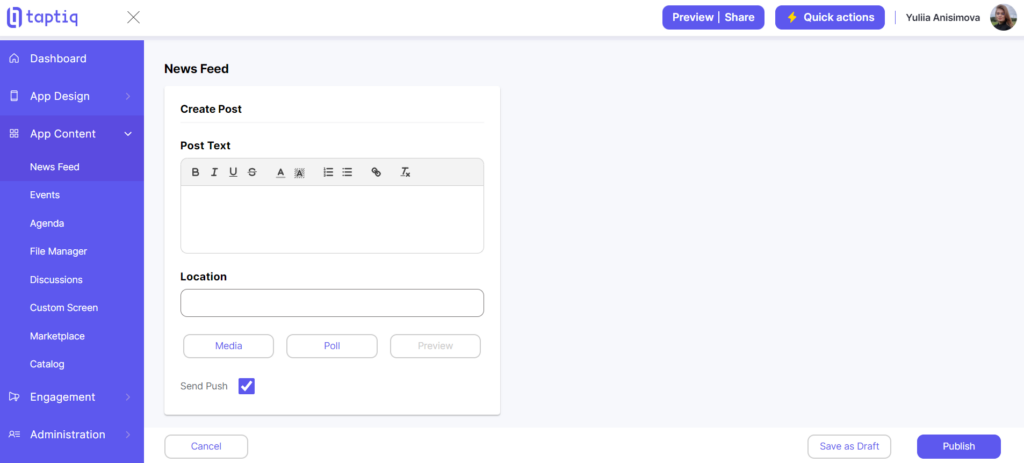
News Feed
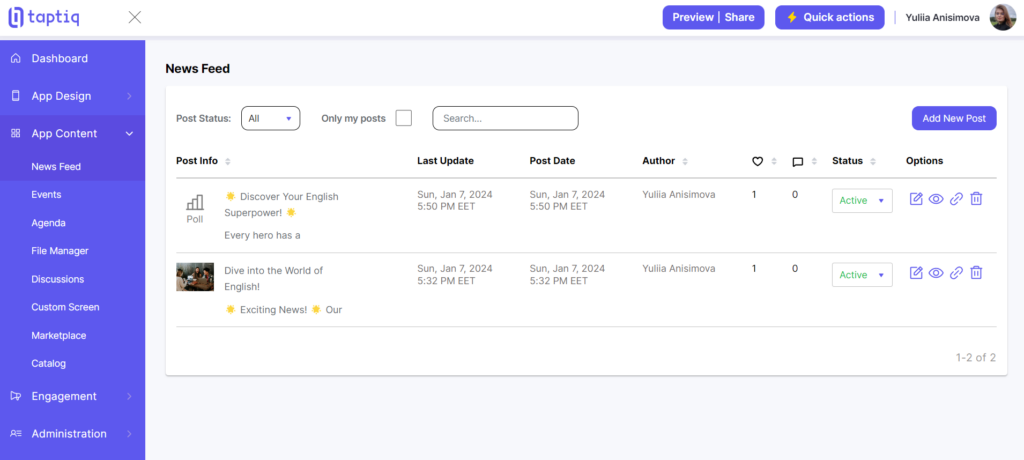
In the News Feed section, you have complete control over your app’s posts. This is where you can manage existing content and create new posts, ensuring your news feed stays lively and up-to-date.
Managing Existing Content:
- View Post Details: Check details like post date, last update, author, and user interactions.
- Sort Posts: Organize posts by status – active, inactive, or draft.
- Change Post Status: Update a post’s status to active or inactive.
- Edit Posts: Make changes to your existing posts.
- View Posts: Look at how your posts appear to users.
- Copy Post Link: Share posts outside your app easily.
- Delete Posts: Remove posts that are no longer needed.
Creating New Posts:
- Add New Post: Click the ‘Add New Post’ button to start.
- Enter Information: Fill in your post’s content. You can add media or create a poll (poll options have a 25-symbol limit).
- Send Push Notification: Check ‘Send Push’ to notify users about the post.
- Publish or Draft: Choose to publish immediately or save your post as a draft for later.
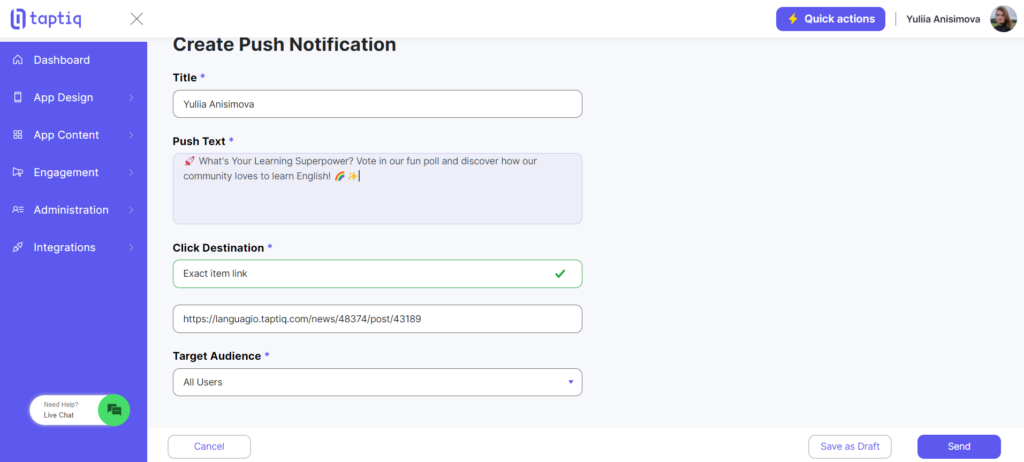
Setting Up Notifications for Your Post:
- Enable Push Notifications: Before publishing, select the ‘Send Push’ option.
- Compose Your Notification: Add details like the title, message, and destination (link to a specific page or section in your app).
- Select Audience: Choose who will receive this notification.
- Send When Ready: Once everything is set, simply press ‘Send‘.
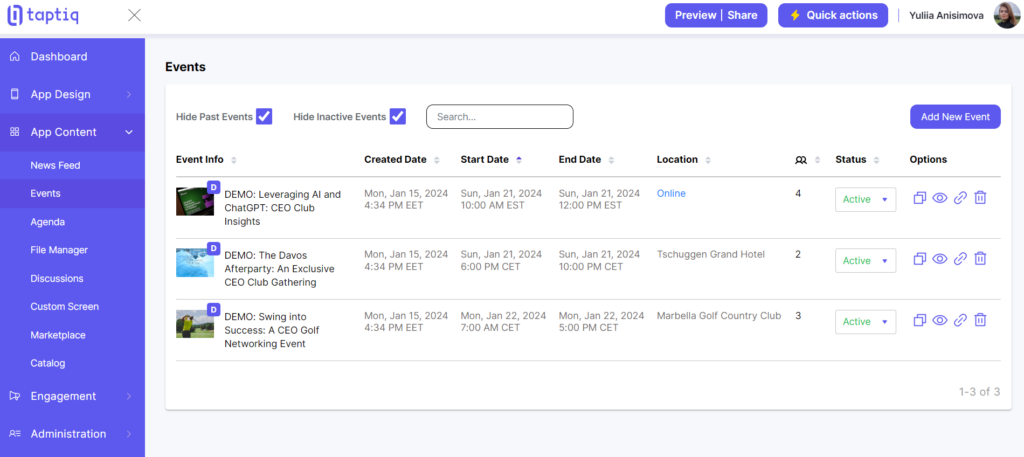
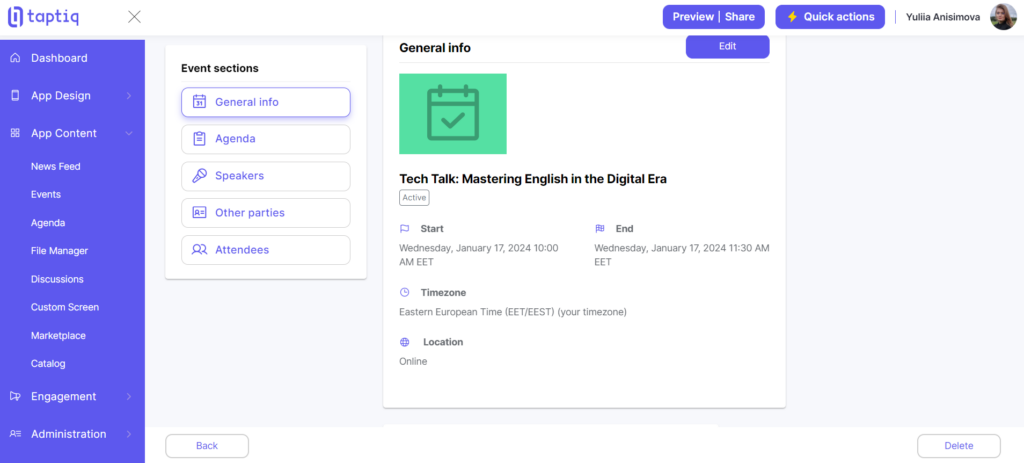
Events
In the Events section, you have a variety of tools to manage your events. Here’s what you can do:
- View Event Information: Check key details like start/end dates, location, and the number of registered users.
- Remove Events: Delete any event that is no longer needed.
- Clone Events: Create a copy of an existing event, useful for recurring events.
- Preview Events: See how an event looks before it goes live.
- Copy Event Link: Share your event easily with a link.
- Create a New Event: Start a new event from scratch, adding all the necessary details.
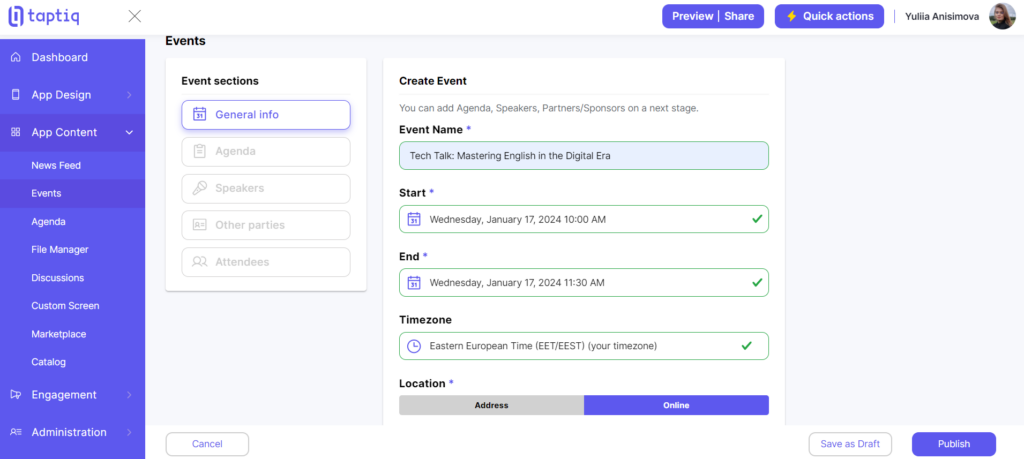
Creating an Event:
- Start the Process: Click the ‘Add New Event’ button to begin creating your event.
- Enter General Information: Fill in the basic details of your event. You can add more sections like speakers and the agenda later.
- Set the Location: Provide the address for offline events or a link for online events.
- Choose Registration Type: Select whether registration will be internal (within the app) or external (via an outside registration link).
- Save or Publish: Decide whether to save your event as a draft to edit later or publish it.
- Add More Details: After saving or publishing, you can add additional information such as the agenda, speakers, and related users.
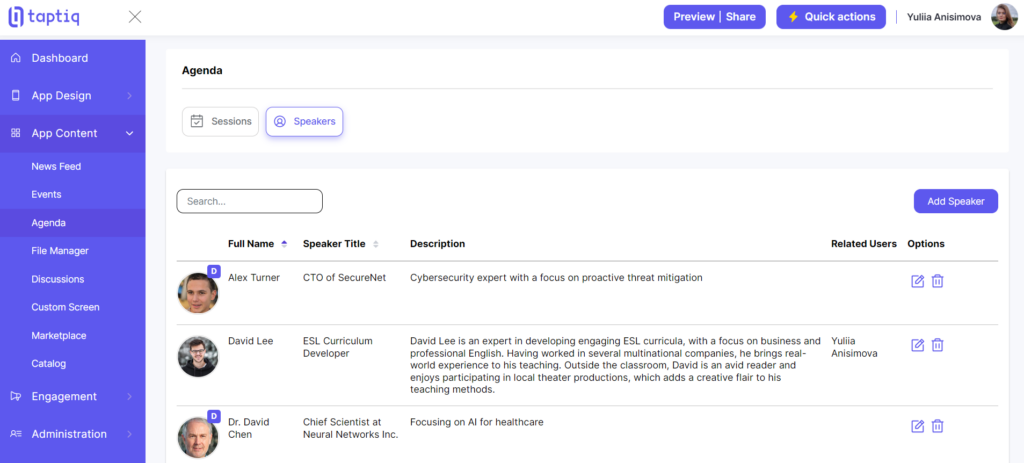
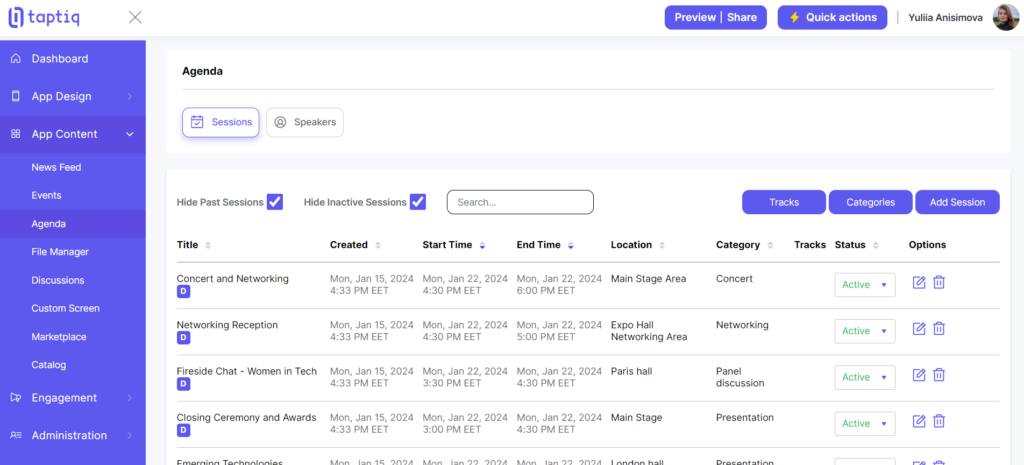
Agenda
The Agenda is your straightforward tool for planning and managing session details. It’s split into two main parts. The first is ‘Sessions’ for scheduling and organizing different event activities, and the second is ‘Speakers’ for adding and managing details about the people presenting.
Speakers:
- Create New Speaker: Click ‘Add Speaker’ and enter their information.
- Manage Existing Speakers: Edit details or delete speakers as needed.
Sessions:
- View Session Information: Check details of existing sessions.
- Manage Sessions: Change a session’s status, edit details, or delete it.
- Add Tracks: Tracks are themed paths within your session, like ‘Technology’ or ‘Health’, organizing sessions under common topics.
- Add Categories: Categories are ways to group sessions, such as ‘Workshops’, ‘Keynotes’, or ‘Panel Discussions’.
- Add a Session: Create a new session with its specific details and assign it to tracks and categories as appropriate.
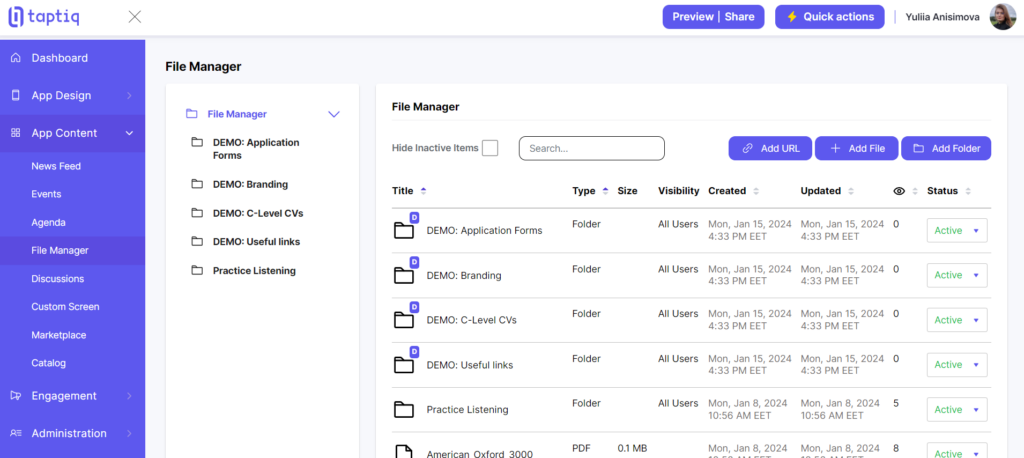
File Manager
Think of the File Manager as our app’s personal online storage space. It’s a place where you can keep all kinds of digital files and links you need, organized and easy to find. Whether it’s documents for work or important links, the File Manager makes storing and accessing them simple.
Key Features:
- Add Links: Save web links easily.
- Upload Files: Directly upload any file.
- Create Folders: Organize files by grouping them in folders.
Discussions
In your app, Discussions are crucial. They’re where your audience connects, shares, and learns. Let’s look into how you can manage this part easily.
Setting Up Categories
Categories organize topics in Discussions, guiding users to their areas of interest.
Managing the Categories:
- Overview: Check details like the number of discussions, posts, followers, and the dates of creation and updates for each category.
- Adjust Status: Sitch between active and inactive states.
- Edit: Modify the category’s title or position.
- Preview: See the category from a user’s perspective.
- Copy Link: Easily share the category with a direct link.
- Delete: Remove categories that are no longer needed.
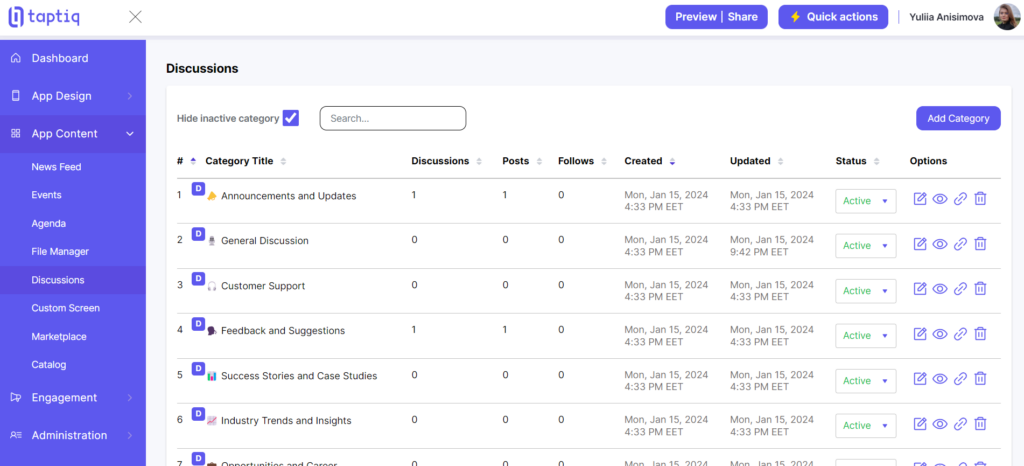
Adding a New Category:
- Press ‘Add Category ‘: Click the ‘Add Category’ button.
- Title Your Category: Enter a name for your category. This is what users will see.
- Choose Position: Decide where your category will appear. Categories higher up are more visible to users.

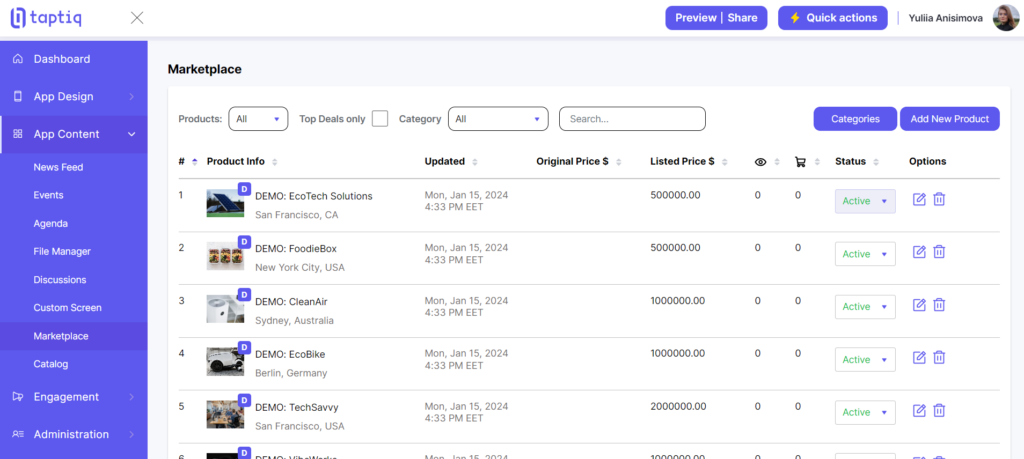
Marketplace
The Marketplace in our app is a dynamic platform for selling products. Whether managing existing products or adding new ones, the process is designed to be simple and user-friendly.
Managing Existing Products:
- View Product Details: See vital information like views, purchases, and pricing.
- Change Status: Easily switch between ‘active’ and ‘inactive’.
- Edit: Update product information to keep listings fresh.
- Delete: Remove products that are no longer for sale.
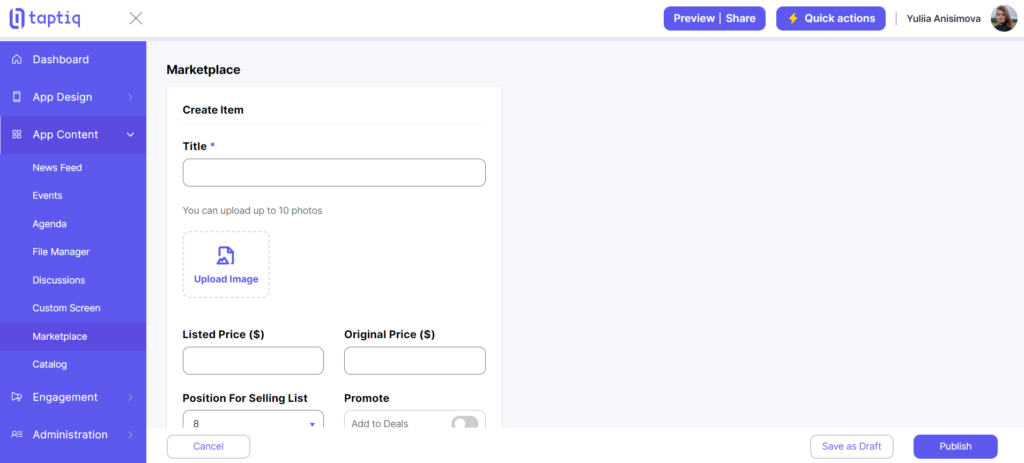
Adding New Products:
- Press ‘Add New Product’.
- Add Title and Image: Name your product and upload a picture to show it off.
- Set Prices: Specify the listed and original prices.
- Adjust Position: Determine the product’s placement in the selling list.
- Promotions: If you want, include your product in special deals to attract more buyers.
- Categorize: Choose the right category, specify the location, and add a description along with tags.
- ‘Buy’ Button Settings: Customize how this button works for your product.
- Related Users: Link users associated with the product, if applicable.
- Send Push Notifications: Optionally, notify your users about the new product.
Categories
Additionally, you can create product categories. They are great for sorting products, making it much easier for users to find exactly what they’re looking for quickly.
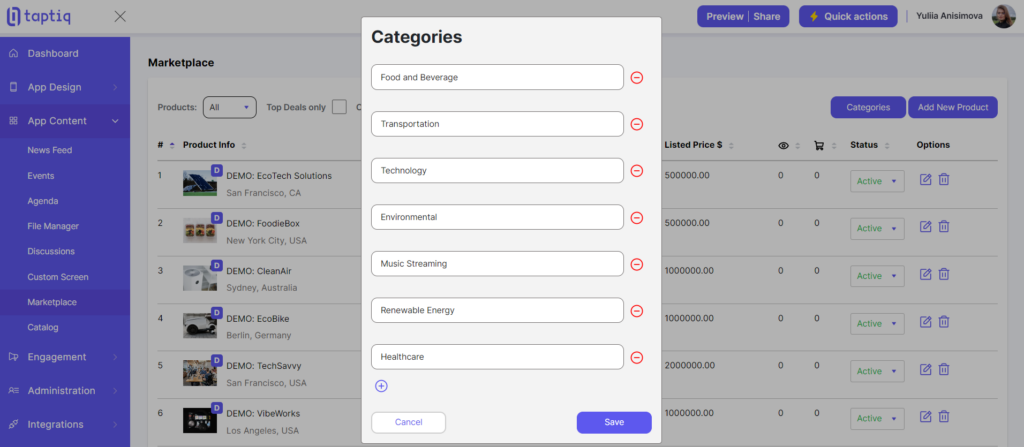
With these easy-to-use features, your Marketplace becomes a great place for selling. Your products will be shown in the best way, making sure the right customers see them.
Catalog
The catalog in our app is more than just a list. It’s a useful tool that can do many different things to make the app experience better and show off what we offer. It helps you connect with users in many creative ways. Here are some ideas on how you can use the catalog:
- Educational Resources: Offer e-learning courses, tutorials, or educational materials.
- Portfolio or Project Display: Showcase your completed projects or case studies.
- Membership Plans or Subscriptions: Detail different subscription options or services.
- Promotional Offers: Highlight special deals, discounts, or seasonal promotions.
- Career Opportunities: Use the catalog to list open job positions, offering users a chance to explore and apply for career opportunities within your company.
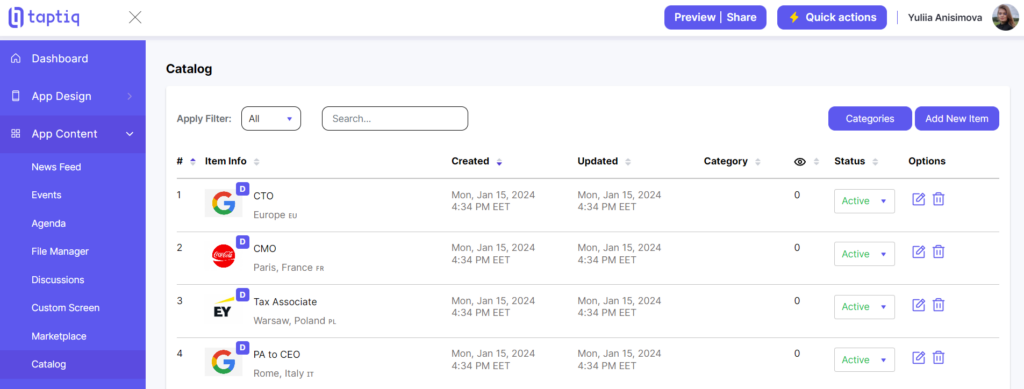
Just like in the Marketplace, the Catalog in our app has flexible features. You can add new items, manage the ones that are already there, and create categories. This makes it easy for you to keep the catalog up-to-date and organized, just like you do with your Marketplace.
Custom Screen
If you’re looking to experiment and put a personal touch on your app, creating custom screens in the Menu & Navigation section is the way to go. This feature allows you to design screens that perfectly fit your app’s style and needs. With an easy-to-use drag-and-drop builder and various customization options, you can bring your creative ideas to life.
Creating a Custom Screen:
- Navigate to Menu & Navigation: Start by going to the Menu & Navigation section in the App Builder.
- Add Menu Item: Select ‘Add Menu Item’ and then choose ‘Custom Screen’.
- Customize: Here, you can change the icon, title, and visibility of your custom screen as needed.
Editing Your Custom Screen:
- Go to App Content: To edit your custom screen, head over to the App Content section.
- Select Your Screen: Choose the custom screen you want to edit from the list.
- Access the Editor: Once selected, you’ll be taken to the screen editor where you can make your changes.
With these steps, you can start designing a custom screen that makes your app more unique.
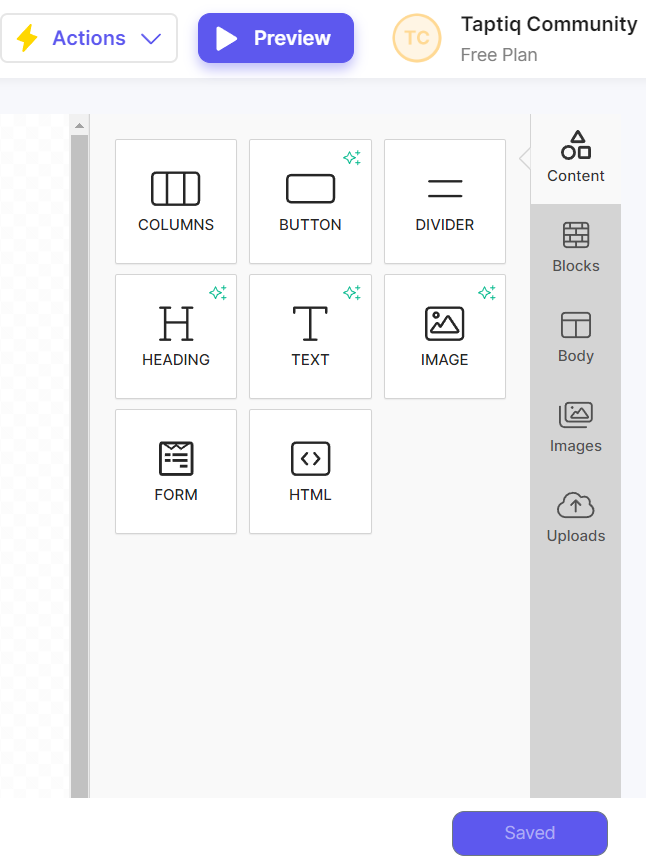
Features of the Custom Screen Builder:
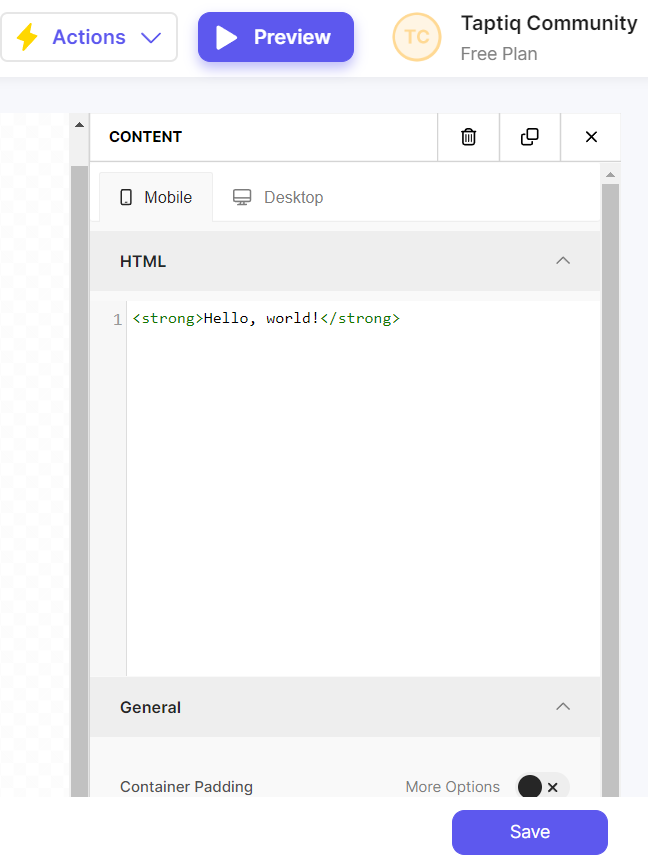
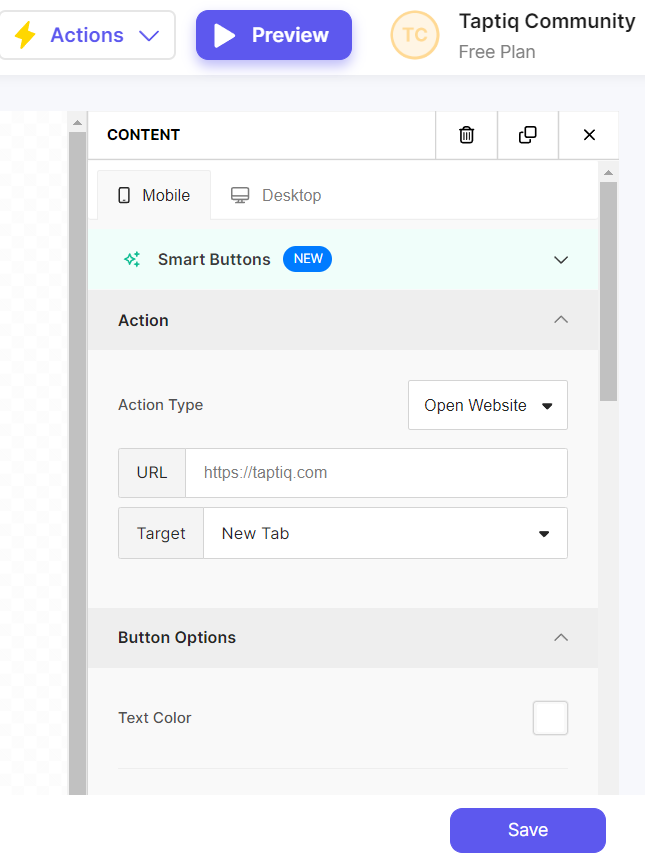
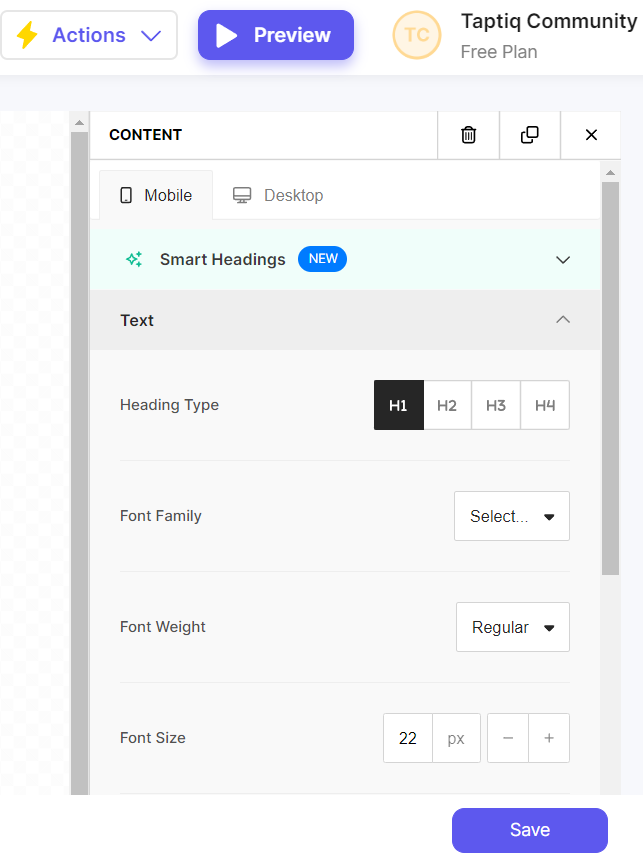
- Content: Choose from a variety of elements like columns, text, buttons, dividers, and forms to add to your screen. For advanced customization, use the HTML feature to insert custom elements.
- Element Settings: Click on any element to access additional settings, such as font-weight and family for text, or border and color options for buttons.
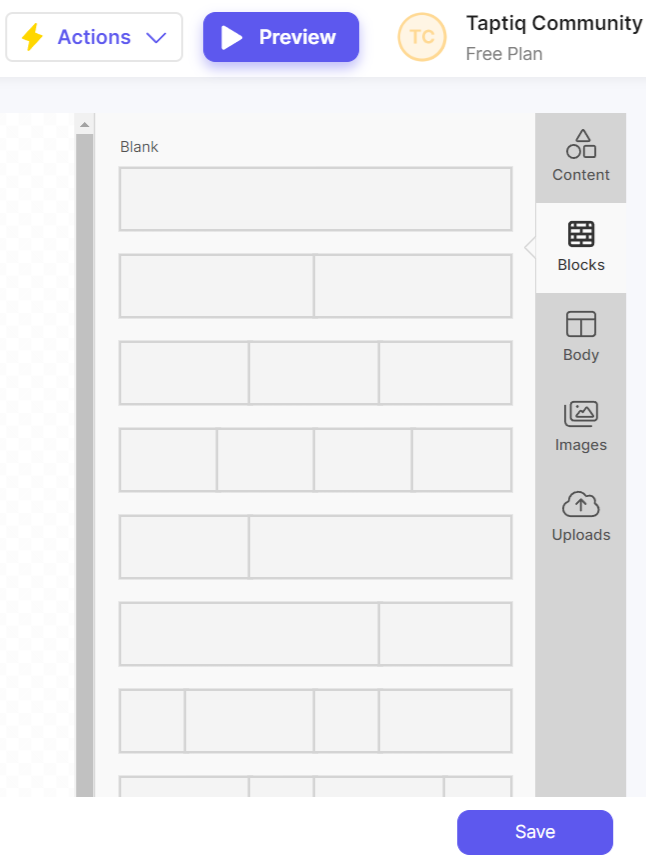
- Layout Blocks: Select from different layout blocks to design the structure of your screen.
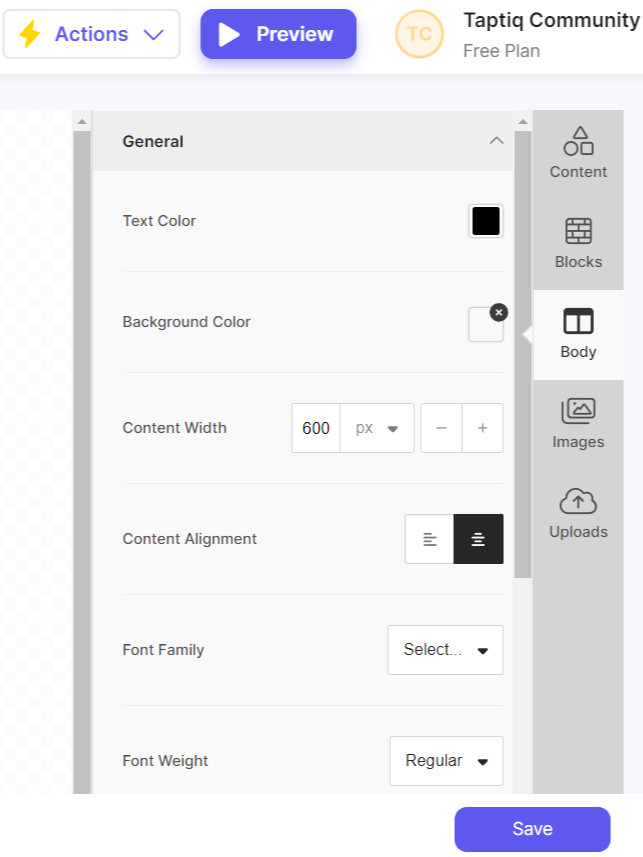
- Body Settings: Adjust general settings for the entire screen in the Body section.
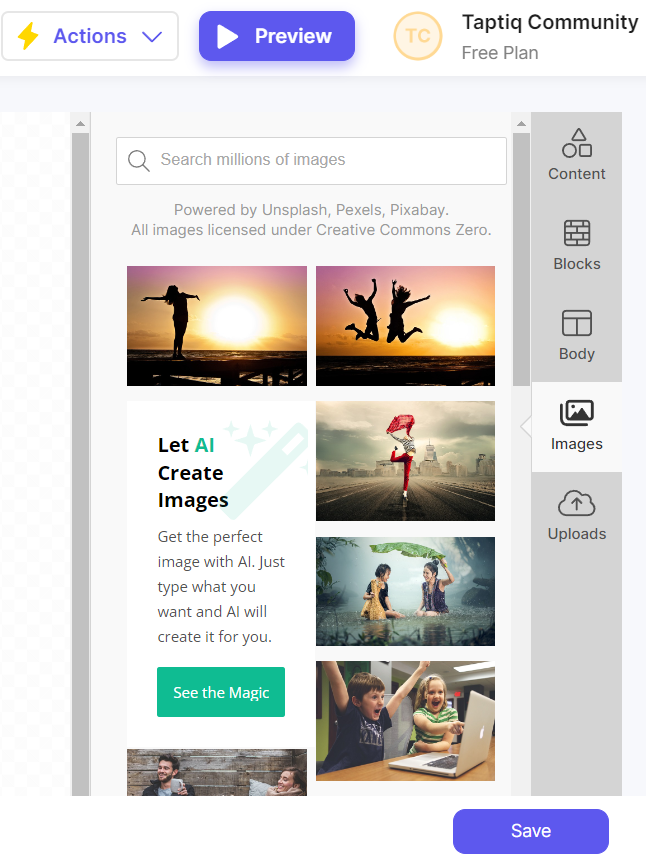
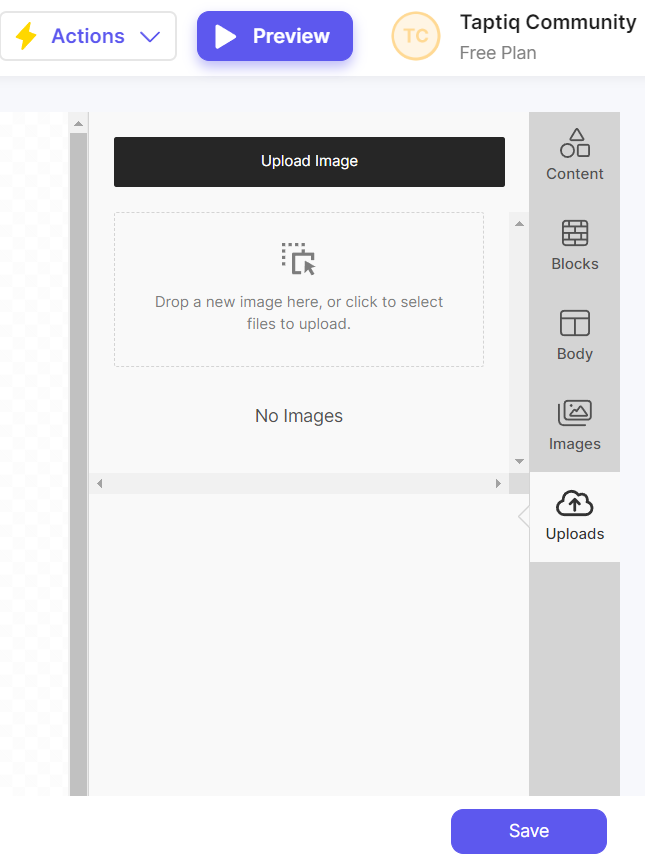
- Images: Utilize a wide range of free-to-use images from sources like Unsplash and Pexels.
- Uploads: Upload your images or media to add a personal touch to your screen.
App Users
Profile Fields
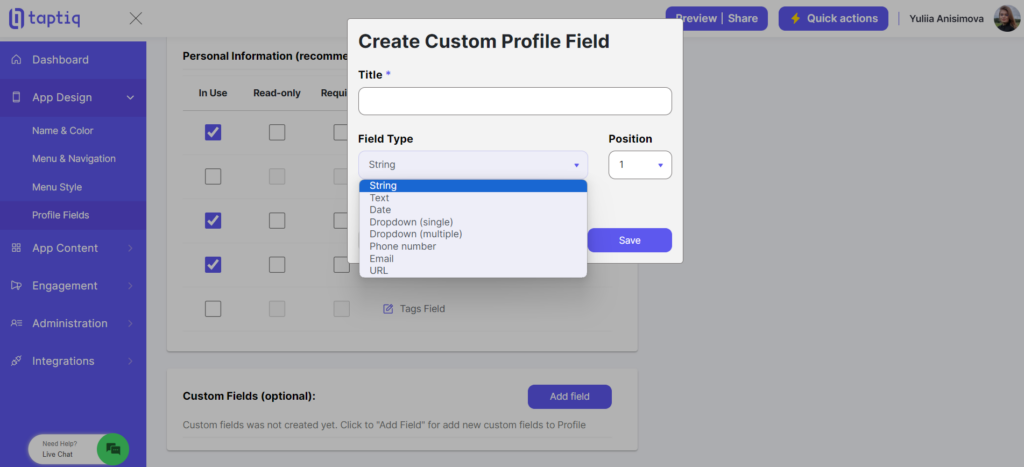
In the Profile Fields section, you have control over the information users provide. This feature allows you to:
- Define Fields: Pick the information fields for user profiles.
- Set Field Properties: Choose which fields are read-only or must be filled in.
- Customize Titles: Change the titles of fields to fit your app better.
- Add Icons to Some Fields: For some fields, you can put in icons to make them stand out.
- Create Custom Fields: Click ‘Add Field‘ to make a field just for your app. Set its title, choose the type (like string, number, etc.), and decide where it goes.
Groups
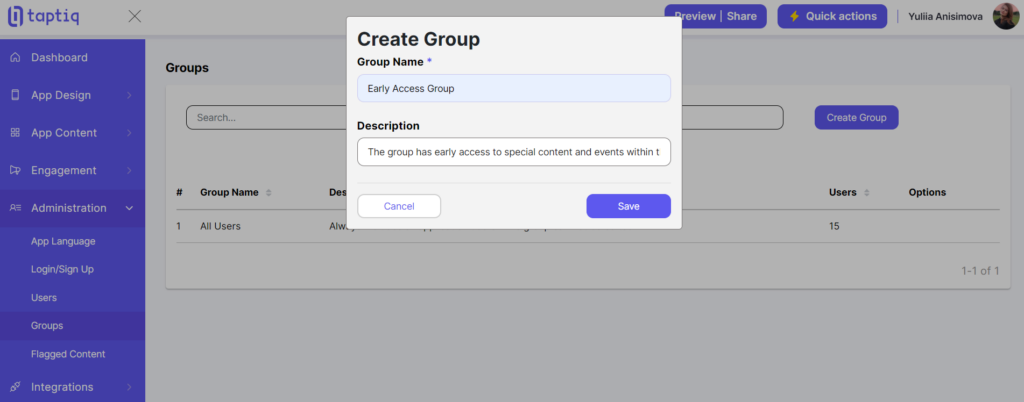
To create user groups go to App Users-> Groups. This is where you manage all user groups within your app:
- Click on the Create Group button to start.
- Add the title and description.
- Once you’ve filled in the details, hit Save to create a new group.
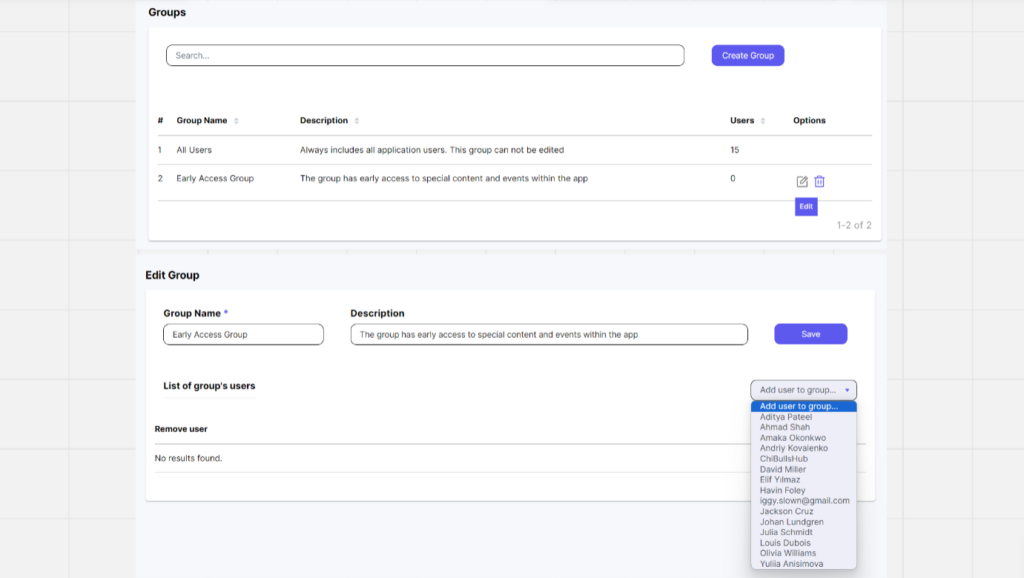
Adding Users to the Group:
- Find the group you’ve just created and click edit to modify it.
- You’ll see a list of users in the Add user to group section. There you can select the users you want to add to the group.
- After selecting the necessary users, click Save to apply the changes.
Login Options
- Manual User Approval: You can choose to approve each new user manually. This adds more security and control, ensuring only authorized users gain access.
- Google Sign-Up Option: You can enable or disable user sign-up via Google. This option can simplify the sign-up process for many users, offering a quick and secure way to register using their Google accounts.
- Custom Error Messages: Personalize the messages that appear for different sign-up or login errors, such as incorrect password attempts or attempts to access blocked user accounts.
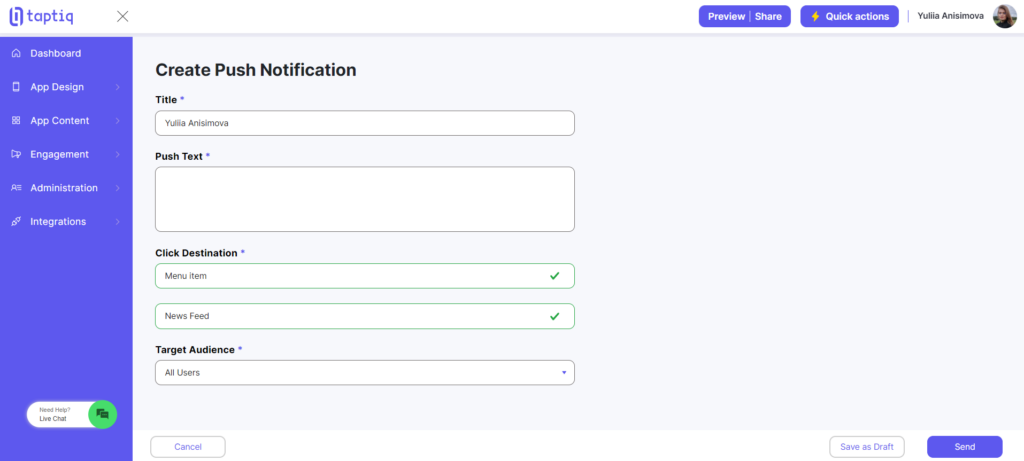
Push Notifications
In this section you can create and manage notifications, ensuring you stay connected with your users. Here’s how you can create a new notification:
- Start with ‘New Push Notification’: Click on the ‘New Push Notification’ button to begin crafting your message.
- Craft Your Message: Add a title and the message content you want to send to your users.
- Set the Destination: Choose where users will be directed upon clicking the notification. This can be a specific menu item within the app (select which one) or an external link (provide the URL).
- Select Your Audience: Choose who should receive the notification. This ensures that the right users get the relevant information.
- Save or Send: You can send the notification immediately or save it as a draft. If saved as a draft, you can come back to edit and send it later.
Administration
In the Administration section of our app, you have the tools to fine-tune important settings. Here, you can set up the app language, manage how users log in and sign up, oversee user accounts, organize groups, and keep an eye on flagged content. This is your control center for making sure the app runs smoothly and meets your users’ needs.
Users and Groups
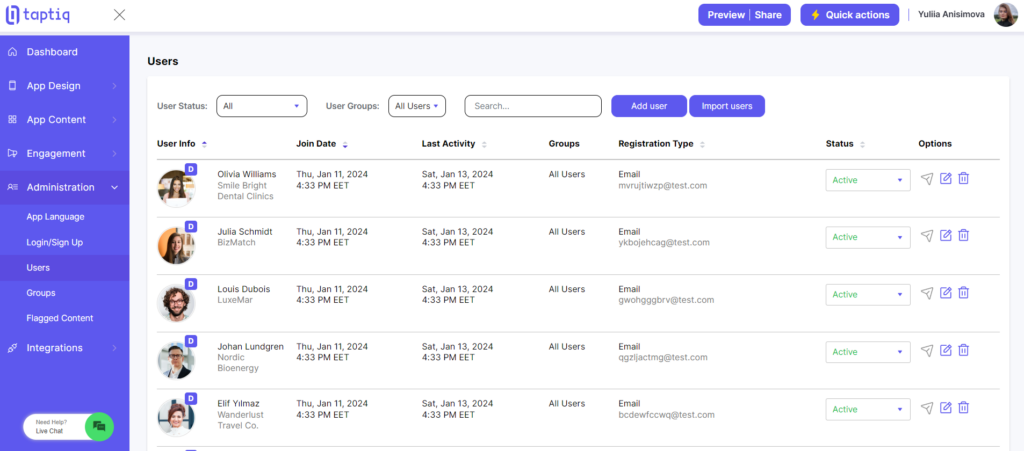
In the Users part you can easily handle everything about your users. This is important for keeping your user community well-organized and active. Here are the things you can do:
Managing Existing Users
- Change Status: Update a user’s status to active, inactive, or login restricted.
- Edit User Information: Modify details in a user’s profile. Here, you can also block a user if necessary.
- Delete User: Remove a user’s account from the platform.
- View Basic Info: Check information like the user’s related group, join date, last activity, and registration type.
Adding New Users
- Manual Addition: Manually add a user by providing their email, and full name, assigning them to a group, and optionally sending an invitation via email.
- Import: Import multiple users at once using a file in formats like .xls, .xlsx, or .csv. This is especially useful for adding users in large numbers or migrating users from another system.
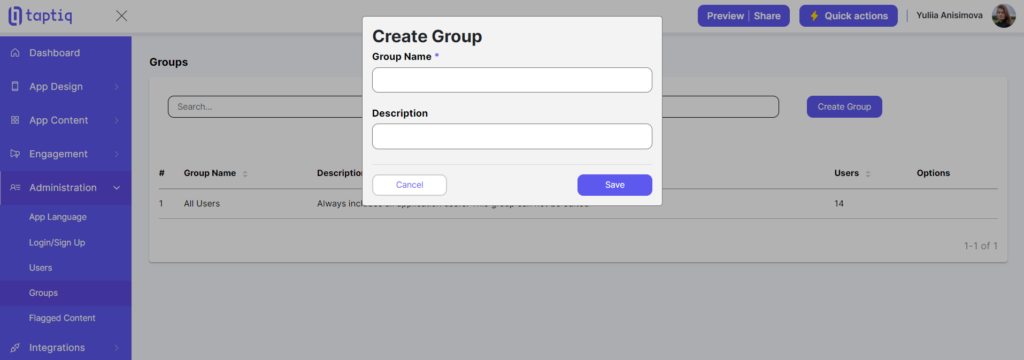
The Groups feature lets you create separate groups and assign users to them. This is useful for organizing users based on different criteria or roles.
Creating and Managing Groups
- Start with ‘Create Group’: Click the ‘Create Group’ button to form a new group.
- Name and Describe: Provide a name and a brief description of the group. This helps in identifying the purpose or the members of the group.
- Save and Edit: Once the group is created, you can edit it. Click the ‘Edit’ button.
- Add Users to Group: In the edit mode, select ‘Add user to group’ and pick the users you want to include from the list. You can also assign users to groups directly when adding a new user or editing an existing one in the Users section.
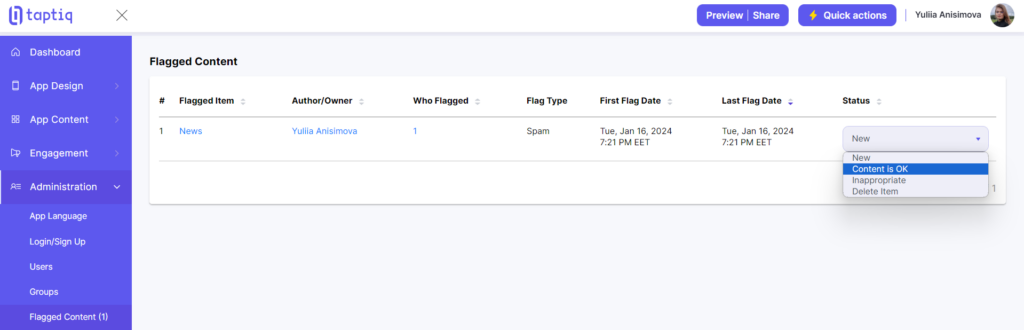
Flagged Content
Flagged Content is a key feature that allows users to report content they find inappropriate or against the platform’s guidelines. This feature is essential for maintaining a safe and respectful environment. It empowers users to help moderate the community and ensures that the content aligns with community standards.
Managing Flagged Content:
- Viewing Flagged Items: See the specific content that has been flagged.
- Author/Owner Details: Identify who created the flagged content.
- Flagging User: Check which user reported the content.
- Type of Flag: Understand the nature of the complaint, whether it’s for spam, hateful content, misinformation, etc.
- Flag Dates: Track when the content was first and most recently flagged.
- Status Overview: Review and update the status of flagged content (New, Content is OK, Inappropriate, Delete Item).
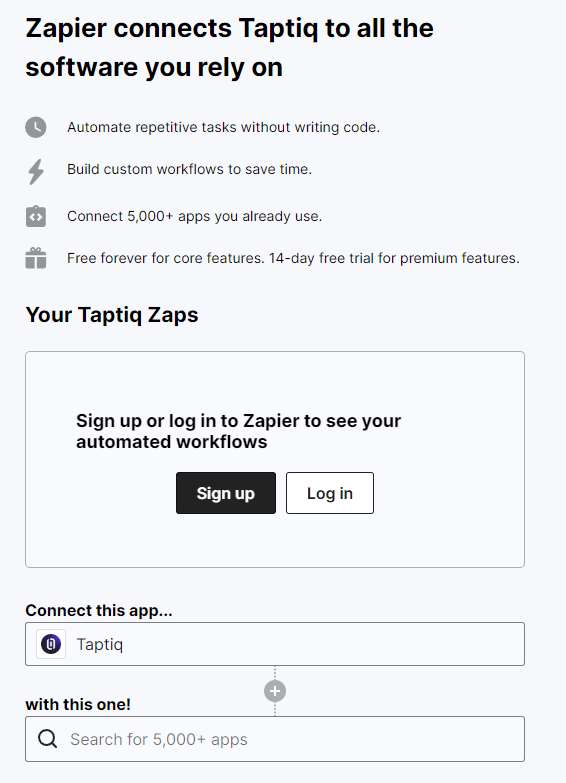
Integrations
You can connect with other software easily using Zapier. This makes your work simpler and faster.
Why Use Zapier?
- Do Tasks Automatically: Zapier does routine tasks for you between different apps. This saves you time.
- Connect with Many Apps: You can link with lots of other apps using Zapier, making your app more powerful.
- No Need to Be a Tech Expert: You don’t have to know coding to use Zapier. It’s easy for anyone to set up.
- Make Your App Do What You Need: You can set up Zapier to do things the way your business needs.
- Keep Your Data Up-to-Date: Zapier helps keep your information the same across different apps, so it’s always current.
- Grow with Your Business: As your business gets bigger, Zapier can handle more work for you.
With Zapier, your app works better with other software, making things run smoothly and efficiently.
Bring It All Together
That’s it! We’ve looked at all the great things our platform provides to build an app that truly meets your business needs. From organizing your content to making your marketplace lively and managing your users, we’ve covered everything. And with Zapier, your app will be even smarter and do things all by itself. So, get ready to transform your bright ideas into a spectacular app that’s as fun and dynamic as it is powerful!
Build Your App Today!