Imagine how much easier your life could be if you didn’t have to spend so much time on monotonous but necessary tasks. Automation is the key to success in today’s fast-paced business environment. It simplifies complex tasks, saves time, and boosts productivity by making your workflow smoother. With Zapier, automation is easier than ever. It connects your favorite apps to handle routine tasks and frees up your time for more important things. In this article, we’ll cover how to use Zapier to help your business succeed in the digital age. It’s all about using technology to your advantage so you can work smarter, not harder.
Understanding Automation
Automation is a technique used to make something happen automatically. Let’s look at a simple example: you receive notifications whenever you get new messages, emails, or social media updates.
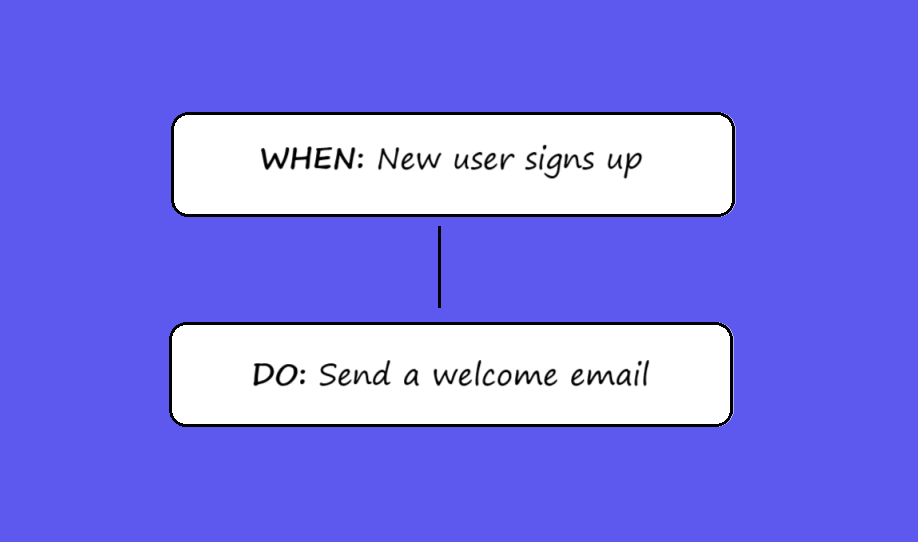
So basically, automation follows a principle: “When this happens, do that”.
What Is Zapier?
Zapier connects your apps and services to automate repetitive tasks. When an event happens in one app, Zapier can tell another app to do a particular action. For example, if you get an email with an attachment, Zapier can automatically save that attachment to your Dropbox and then send you a notification on Slack. Best of all, you don’t need to have any coding skills. Isn’t this awesome?
3 Key Benefits of Using Zapier
- Time-Saving and Productivity Boost: By automating repetitive tasks, you free up time for more significant work and increase productivity. It allows you to focus on strategic planning, creativity, and other crucial aspects to ensure your business growth.
- Cost-Effective and Error-Reducing: Zapier handles tasks automatically, so you don’t have to pay someone to do them. In the long run, it saves you money and lowers the chance of human error.
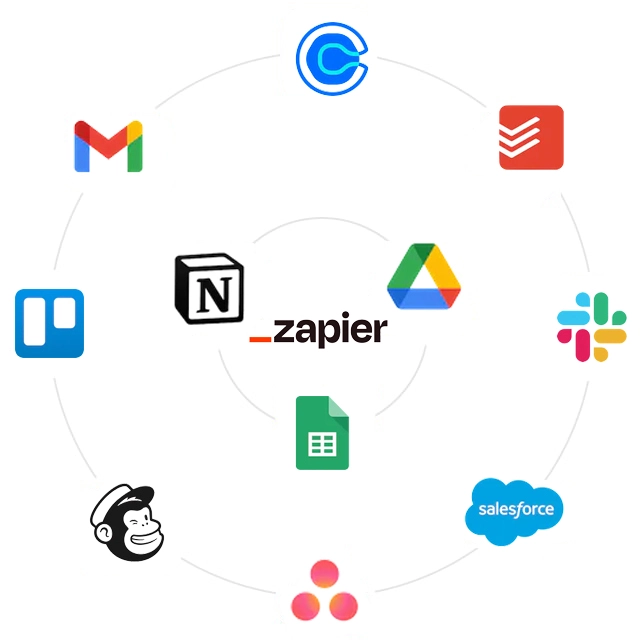
- Flexibility and Scalability: Zapier links more than 6,000 apps, including email, social media, cloud storage, and more. You can easily adapt it to your growing business needs to handle more complex workflows.
Choosing the Right Tasks to Automate with Zapier
Now that you understand the value Zapier can bring, you might be wondering how to choose what tasks are worth automating. So let us help you with this. Following the guidance below, you can uncover the potential of automation for your needs.
Step 1 is to find out where automation can help the most. This step includes:
- Setting your goals.
Answer these 3 questions: What do you want to achieve? What actions can get you there? How might automation help? - Finding Tasks to Automate.
Check your daily work for repetitive tasks, tasks where you need to switch between different apps or transfer data.
Step 2 is about prioritizing the tasks. We can divide them into 4 main groups by importance:
- Easy-to-automate tasks with an immediate, big impact.
- Tasks that might not make a big difference but still help with efficiency.
- Tasks with a big impact but require more skills.
- Tasks that aren’t very important. There’s no need to automate them.
The best approach is to focus on one group at a time before moving to the next. This ensures that by the time you reach the third group, which includes tasks that are more complex and challenging, you’ll already have a few successful automation done and the necessary skills.
After setting your goals and priorities, you’re ready to start building your workflow. Start with a single task and decide what you want to achieve, planning the steps one by one. Ask yourself, “What’s next?”. This question will help you to create a logical automation flow, ensuring a smooth transition from one step to another.
Creating Your First Zap
A Zap is an automated workflow that connects your apps and services. It tells them to follow this instruction: “When this happens, do that.” Every Zap has a trigger and one or more actions. A trigger is an event that starts a Zap, and an action is what your Zap does for you. When you turn your Zap on, it will run the action steps every time the trigger event occurs.
To make creating Zaps and automating necessary tasks for your app possible go to Integrations -> Zapier. Then toggle Enable Zapier Integration.

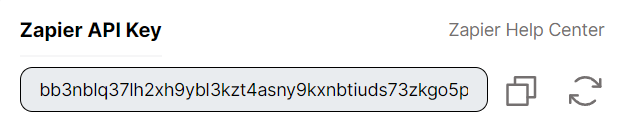
Once you do this, you’ll get a Zapier API Key. It’s a code used to identify a user and is necessary for authentication. You’ll need this key later when signing up for your Taptiq account to set up triggers. Additionally, you can copy this API Key or make a new one here.
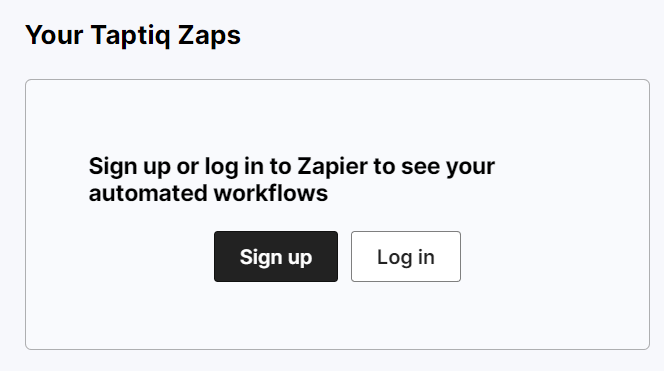
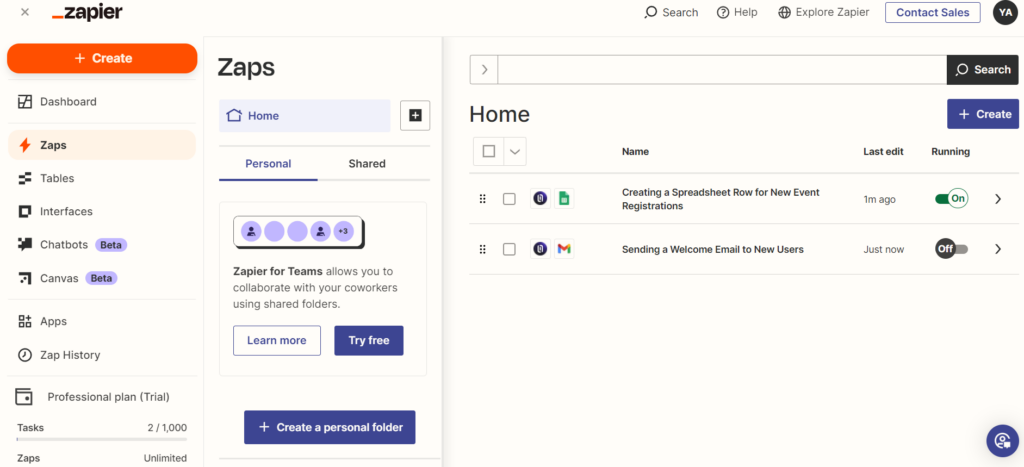
Also, you need to Sign up or Log in to your Zapier account. You can do it with Google, Facebook, and Microsoft or type all necessary information, like your first and last name, by yourself. After you connect your Zapier account, you’ll see the list of your Taptiq Zaps.
Below your API key, you’ll see a list of any triggers you’ve set up. Here’s the information you can find there:
- Type: e.g. “Event: New Registration” – create a spreadsheet row with necessary data in Google Sheets.
- Tasks: The number of actions Zap performs after it is triggered.
- Runs: Number of times the trigger has worked.
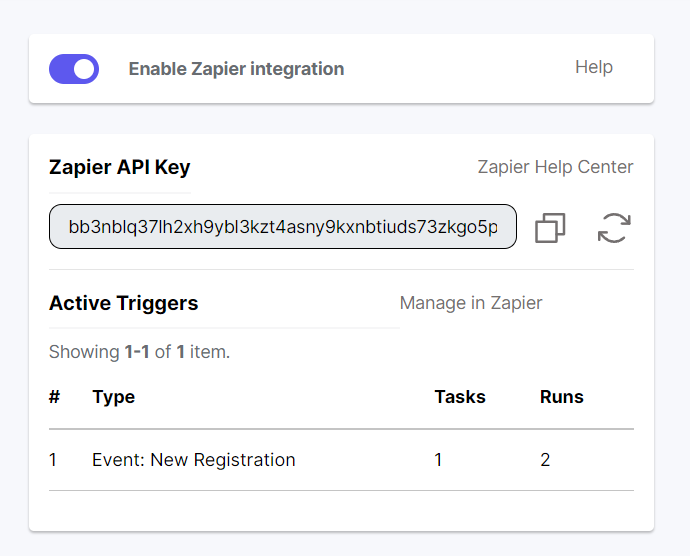
If you click Manage in Zapier, it’ll take you to your Zapier dashboard. There, you can create new Zaps or change the ones you have.
And if you’re looking for more details on how all this works, just hit Zapier Help Center for extra help.
Setting Up Your Zap: Triggers and Actions
Before diving into real-life examples, it’s important to learn the basics of Zap creation. Understanding this process is key to effectively working with different services and making the most out of automation.
Trigger
To set up a trigger we’ll go through three main steps: picking the app and event, linking the app’s account, and testing to ensure that everything works well. We’ll cover each part to help you get started.
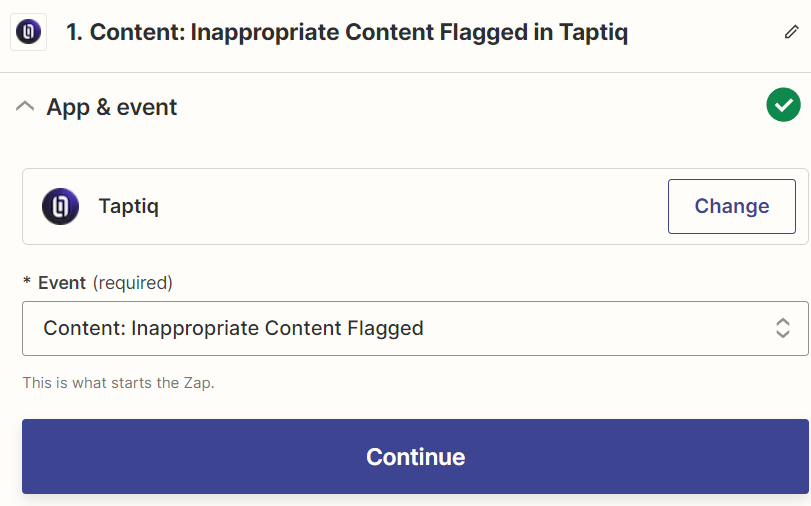
To set up the app and event for your trigger, follow these simple steps in the Zap editor:
- Open the Trigger step by clicking on it.
- Look for the App & event section and choose the app that will trigger your Zap. In our case, it’ll be Taptiq.
- Next, click on the Event dropdown menu and select the specific event that will activate your Zap.
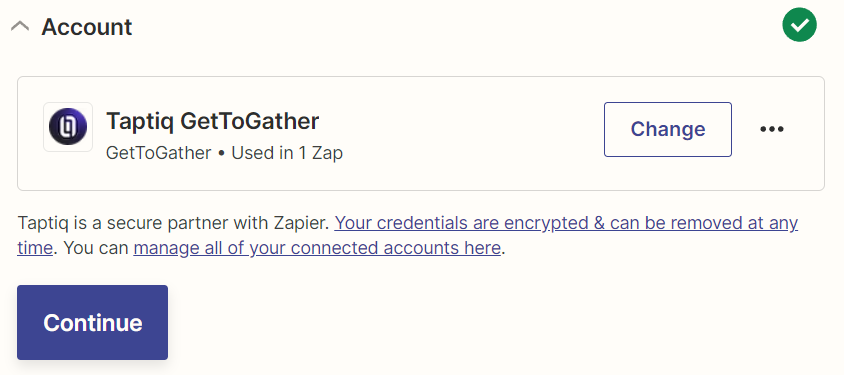
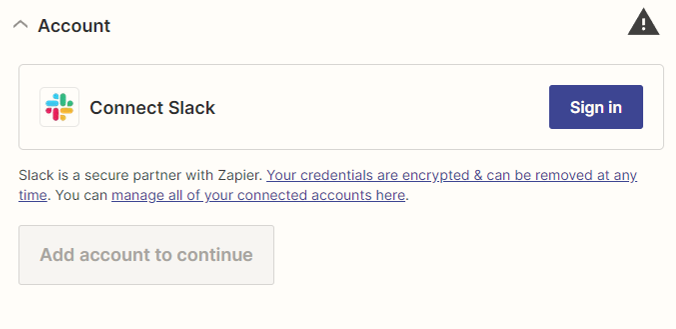
You need to connect your account so Zapier can use it to monitor for trigger events. To do this we need to copy the API Key we covered earlier. Then, in the Account section, click Sign in to connect Taptiq account.
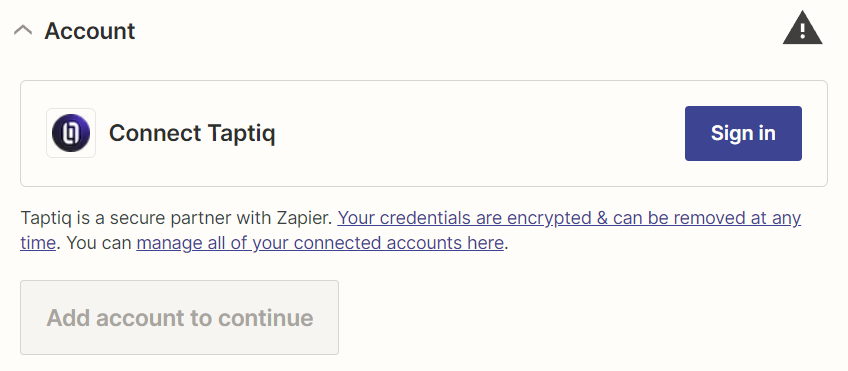
Paste your API Key and press Yes, Continue to Taptiq.

Once an account is connected, click Continue.
The last step in setting up your trigger is testing it.
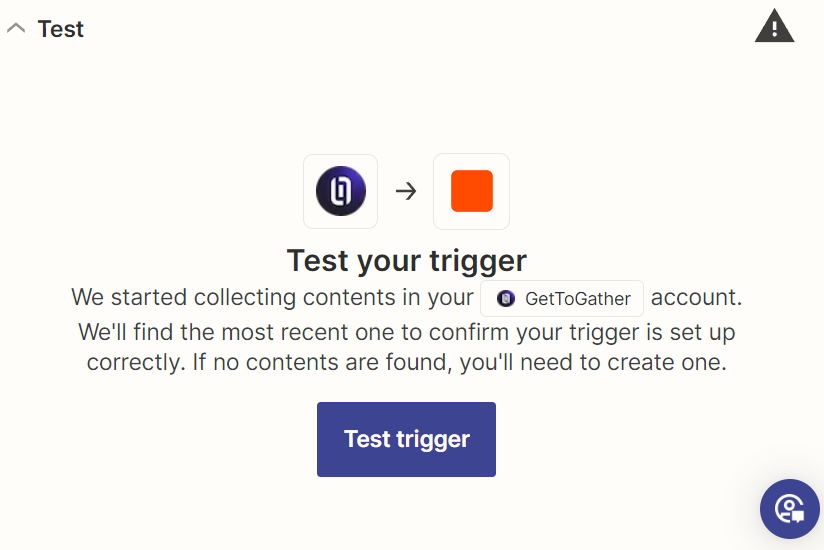
First, we need to learn about test records. What are they? Test records are sample data from your selected app that Zapier uses to verify that your Zap works correctly. When setting up a Zap, Zapier will ask for a test record, like an email, user full name, or something similar, to check if the Zap can notice when something happens and do its job.
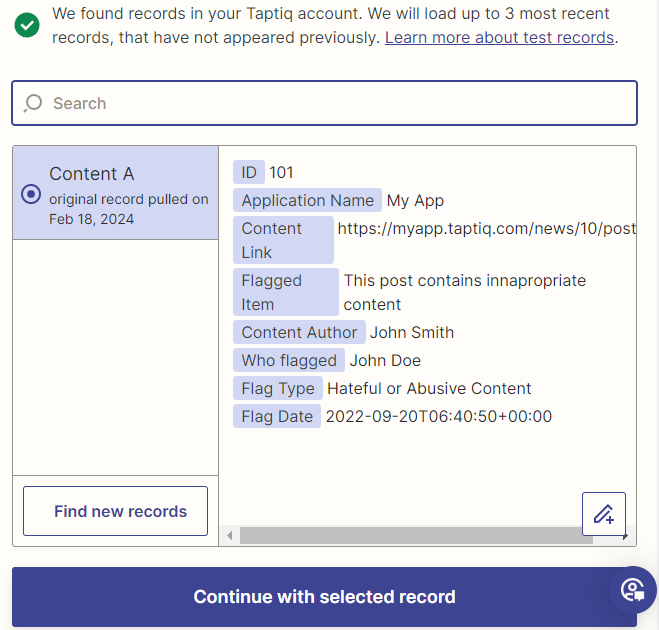
If you need to modify test records in Zapier, you can’t change the original data directly. Instead, you can make a copy of the record you want to edit and then adjust the copy. Here’s how to do it:
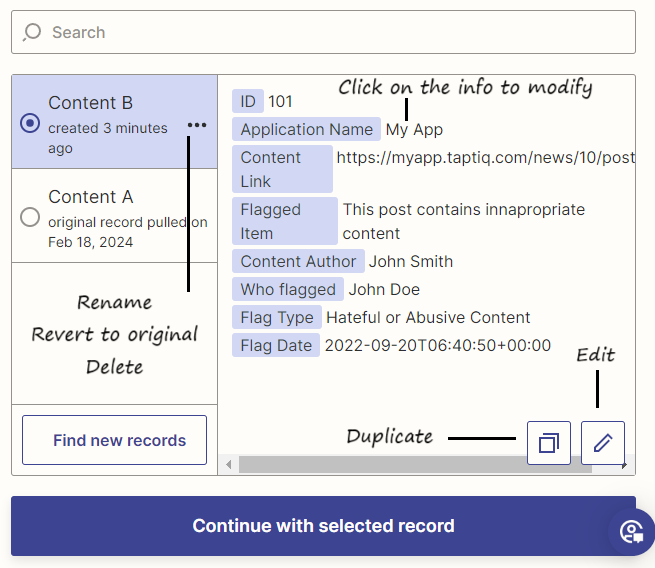
Once you’re done editing and happy with the changes, select the record you want to use for your test and click Continue with selected record.
Action
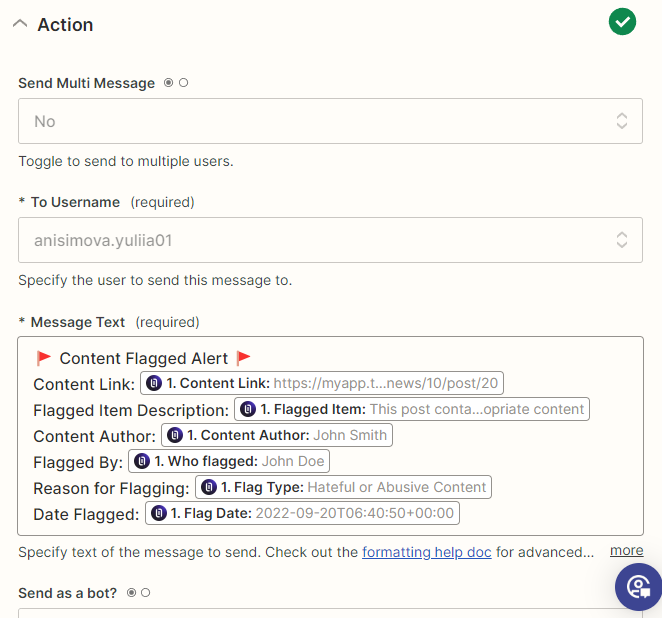
Next, we’ll set up the action for your Zap. First, pick an app and decide what it should do (like sending an email with Gmail, posting a message in Slack, or adding a card in Trello) once the trigger happens.
- Navigate to Action -> App & event.
- Select the app you want to use in your action.
- Click the Event dropdown menu and select the action that you want your Zap to perform.

Connect your account so Zapier can do the task in the app you picked when the action is triggered.
Set up your action. You’ll see some fields you have to fill out (required) and others you can choose to fill out (optional). You might see dropdowns to select from a list of options, text boxes where you can type anything, or list fields for adding several items. This step makes sure the app knows exactly what to do for your Zap.
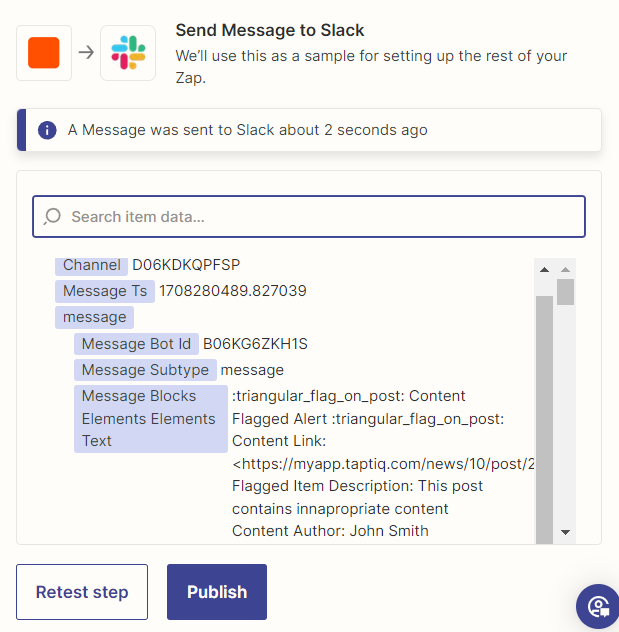
Test to see if your Zap is performing the correct action in your app. First, you’ll see a preview of what Zapier will send to your app. To run the test press the Test step.
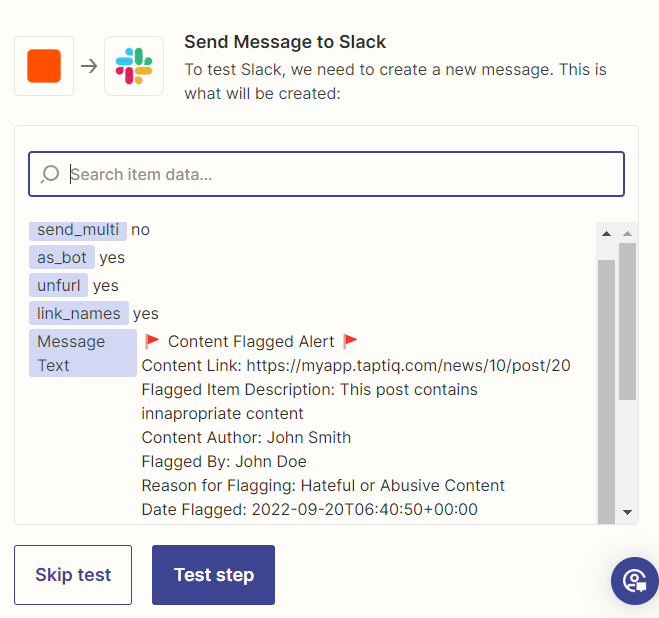
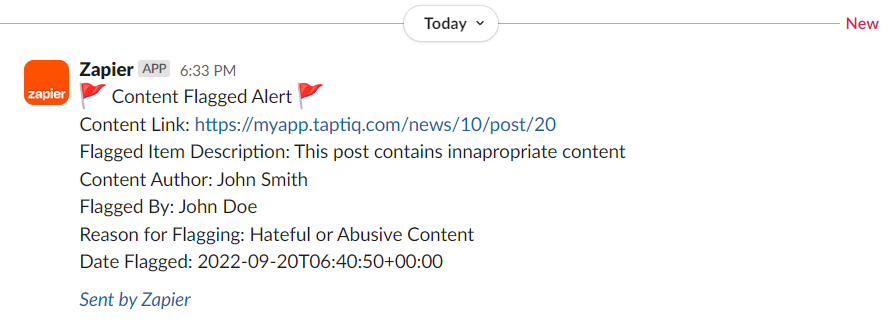
After the test, you’ll see whether or not Zapier sent the data to your app. In my case, I received a message in Slack about flagged content. After the successful test press the Publish button to turn on your Zap.
If something goes wrong, check all settings again and click Retest step.
Now that we’ve covered the basics of setting up triggers and actions, it’s time to apply what we’ve learned. We’ve walked through every step so you can begin creating Zaps with confidence. Next, we’ll explore real-life examples to show how to streamline your daily tasks.
Taptiq and Google Sheets Integration Example
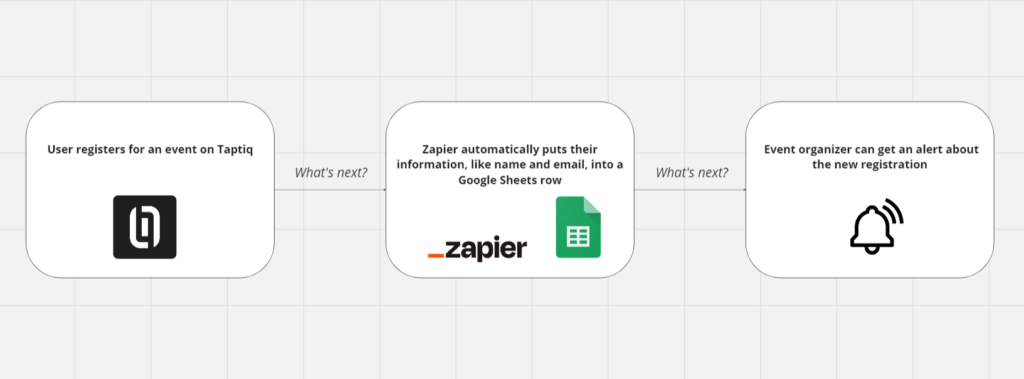
Let’s see how using Taptiq with Google Sheets can make handling information about event attendees easier. The main goal is to simplify how we keep track of people signing up for events. This way, we can easily contact them later, send them special offers, or tell them about other events they might like. With automation, every new sign-up goes straight into a Google Sheet, so we don’t have to enter data manually. It saves time, reduces mistakes, and frees up the team to concentrate on organizing the event.
Here’s a simplified automation sequence:
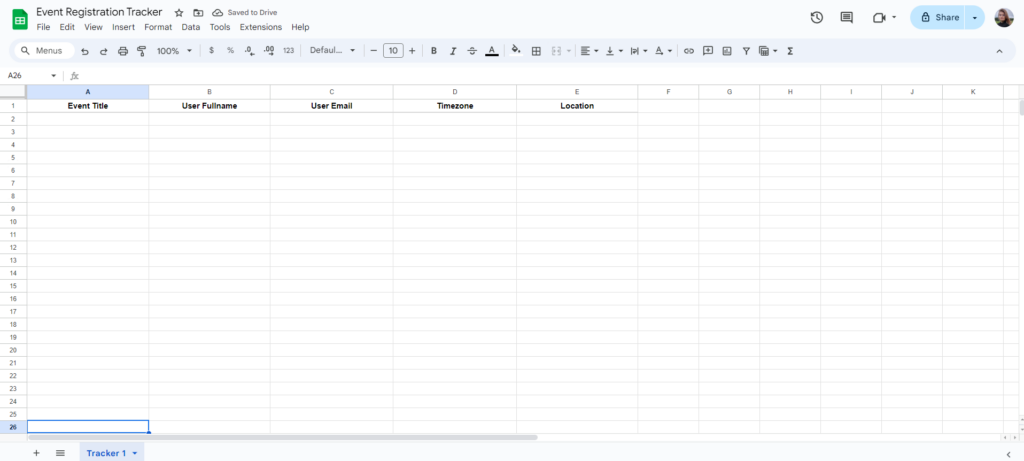
Before we dive into the step-by-step tutorial, there’s a bit of preparation. We need to create a spreadsheet on Google Drive. It’ll be our place to store all the event attendees’ data. It’s important to add headings to our spreadsheet. Later, they’ll be matched with the corresponding user information.
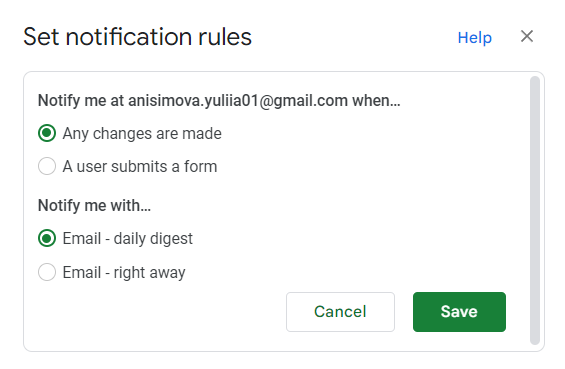
After setting up your spreadsheet, you might want to change notifications to get updates on new registrations. Here’s how you can do it:
- In your spreadsheet, go to Tools -> Notification settings.
- Choose to receive notifications for any changes.
- You can choose to get notifications right away or once a day. If you pick ‘right away’ you’ll get an email each time someone registers. However, the ‘daily digest’ tells you about all the sign-ups from that day. This way, you can keep track without receiving too many emails.
Now that we’re ready, here’s a simple guide to help you set up your event sign-ups with Taptiq and Google Sheets:
Zap Editor’s Advanced Features
In this section, we’re going to briefly explore some of Zapier’s additional settings. They are designed to enhance your Zaps, making them more powerful and tailored to your needs.
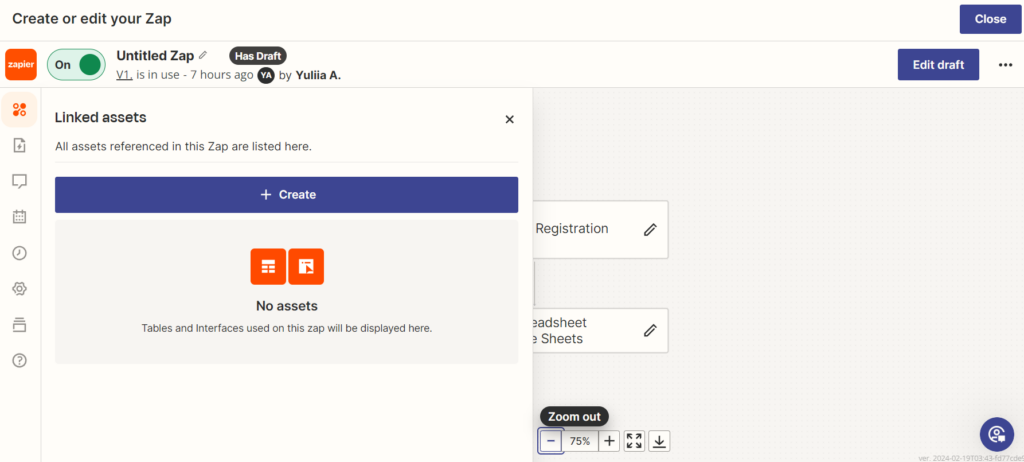
Linked assets
In this part you can create and add tables or interfaces:
- Interfaces help you build your own web pages without much effort. You can drag, drop, and customize the components (e.g. text, media, forms, tables, etc.) and plug them directly into your automated workflows.
- Zapier Tables is an easy tool, like a database, that lets you keep, change, share, and use your data in one spot. It’s great for organizing your information with no need for coding.
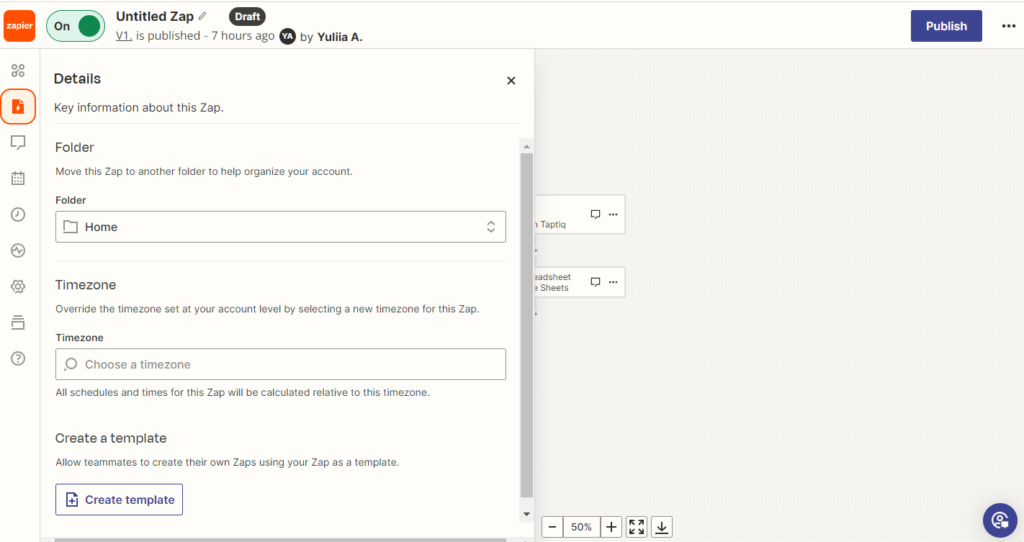
Details
Here, you can do more with your Zaps, such as:
- Move a Zap to another folder: Organize your Zaps better by placing them in different folders.
- Change timezone: Adjust the timezone settings for your Zaps to match your local time or the time zone of your audience.
- Create a template: Templates are pre-made Zaps that you can use as a base to start from. Instead of building a Zap from scratch, use a template to save time. You can customize these templates to fit your specific needs.
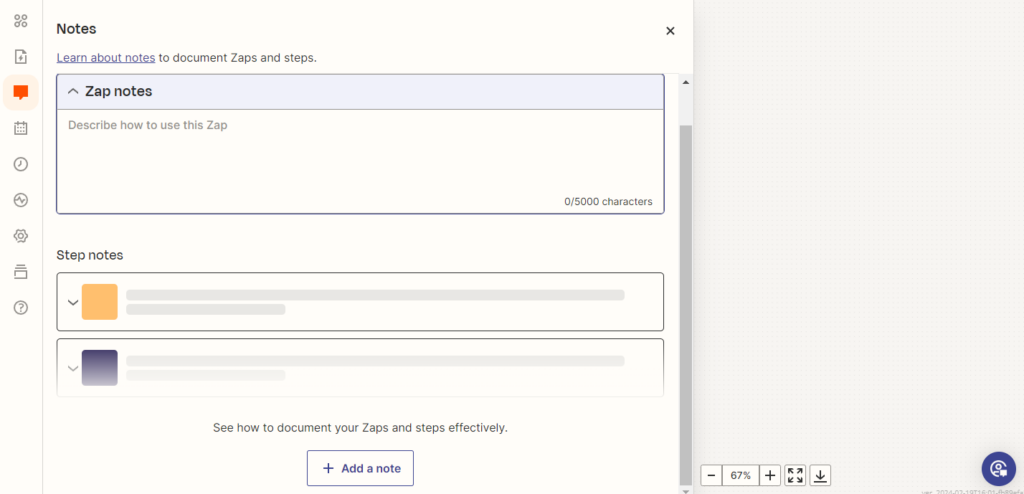
Notes
Zapier notes let you write explanations for your Zaps and their steps. You can use them to:
- Add a description to the Zap, explaining its overall purpose.
- Provide specific instructions or notes for each step within a Zap.
- Record any changes or updates made.
- Share helpful tips or guidelines for others.
This feature makes your Zaps more understandable and easier to manage, especially when working as a team.
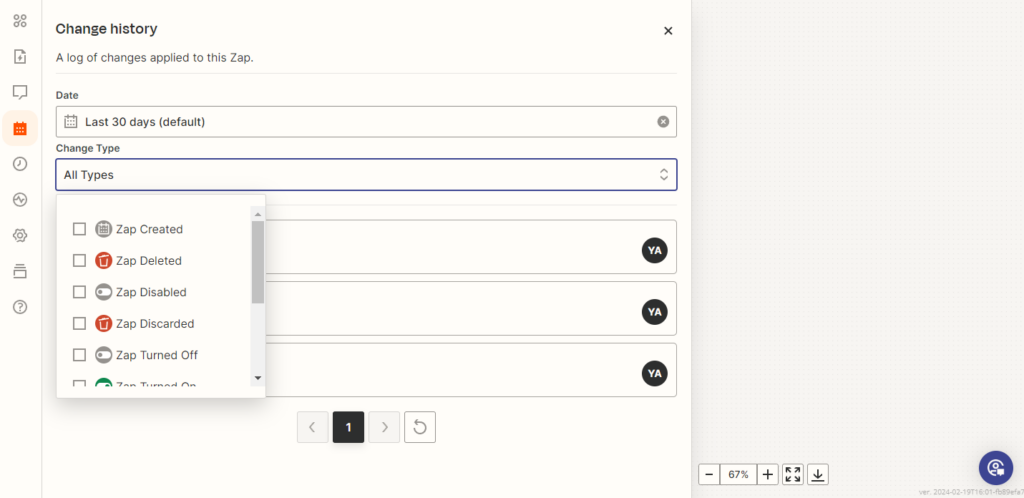
Change history
In the Change History section, you’ll find a record of different activities related to your Zap over a certain period. This includes when your Zap was:
- Turned on or off.
- Created.
- Discarded.
- Restored.
- Changed by the owner, and more.
This log helps you track what changes have been made to your Zap, who made them, and when they were made, providing a clear history of your Zap’s updates.
Zap runs
Zap runs each time it automatically does its job, like moving information from one app to another after a specific event. Each Zap run in the list displays the Zap run status so you can see whether or not your Zap ran successfully. You can search for specific Zaps in the search box or filter Zap runs by the date or status. This way, it’s easy to see how well your Zaps are working.
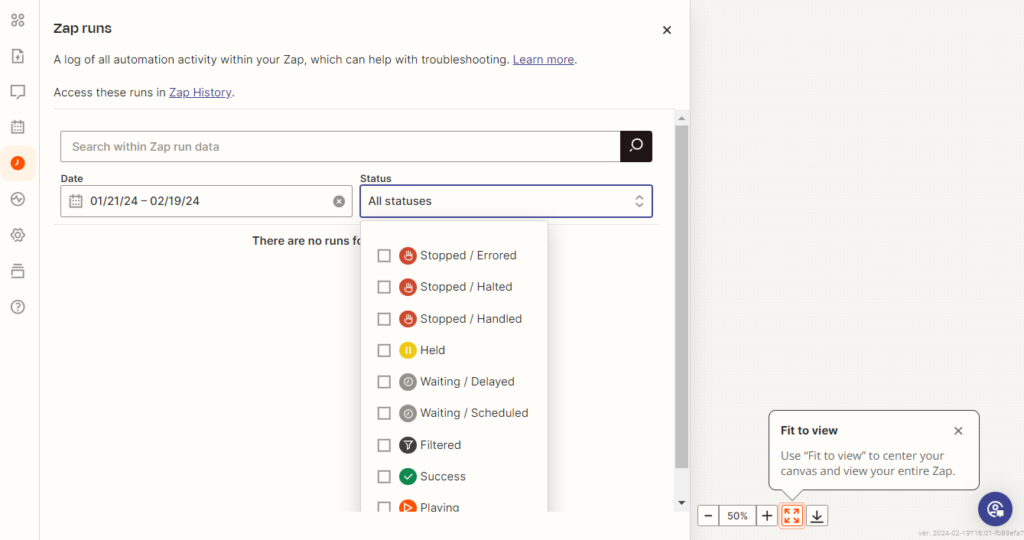
Status
The status section lets you know if there’s anything wrong with your Zap that might stop you from publishing it. It’s like a heads-up to fix any issues before your Zap goes live. The status section is only visible when you’re editing a draft or have any issues after publishing.

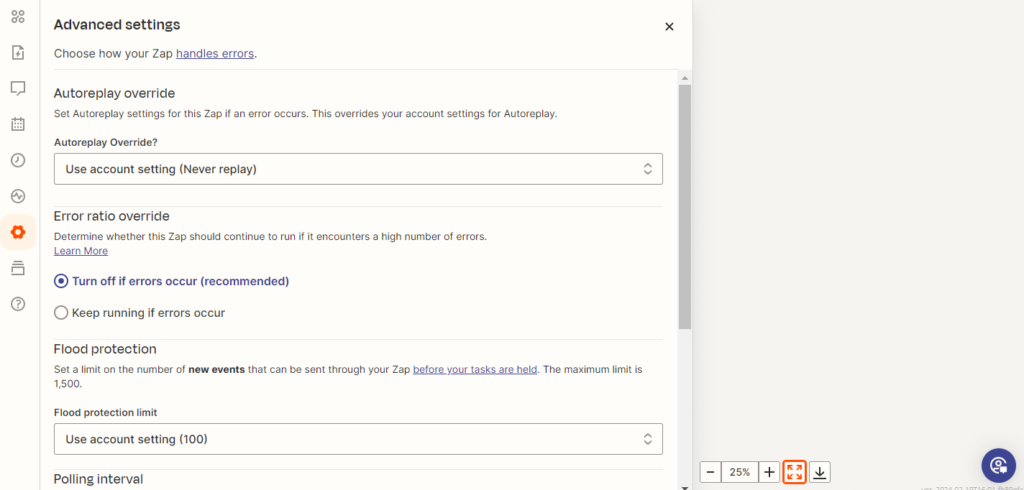
Advanced settings
In this tab, you can adjust settings to manage how your Zap responds to errors or control how often it checks for updates:
- Autoreplay override: If something goes wrong, your Zap can try again. This setting can keep your Zap running smoothly without the need for your help every time there’s a small issue.
- Error ratio override: You can let your Zap keep running even if it runs into many errors. This is useful if you’re okay with some issues and don’t want them to stop everything.
- Flood protection: You can choose a maximum number of new things (like messages or orders) that can trigger your Zap. This helps stop your Zap from doing too much at once, which can be a lot to handle.
- Polling interval: This is about how often, in minutes, your Zap looks for new data to start working. By setting this, you can balance keeping things up-to-date and not overloading the apps you’re using.
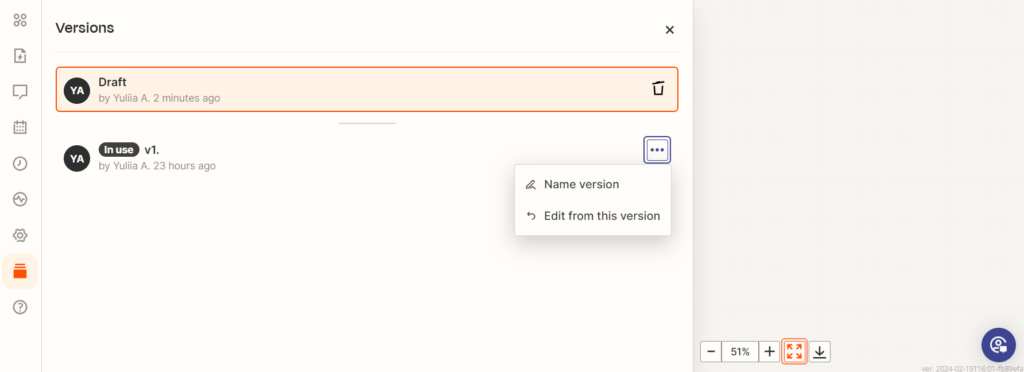
Versions
Here you have the flexibility to rename versions, delete drafts, and select a specific version to edit. This allows you to organize and manage your Zap’s history easily.
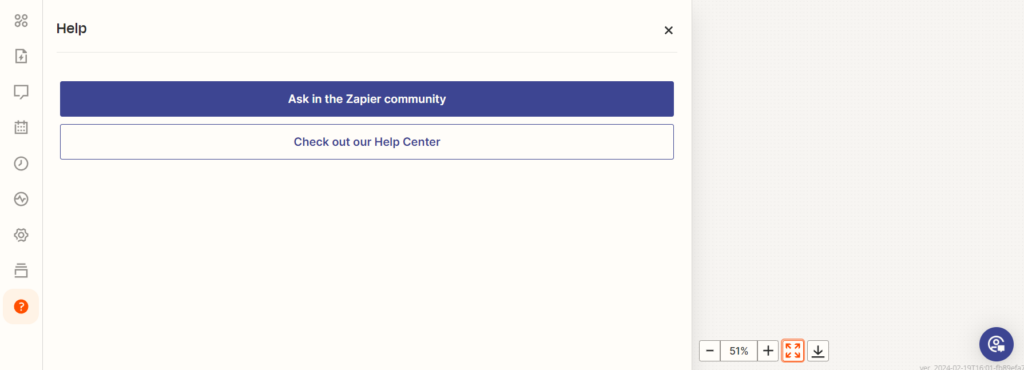
Help
In this tab, you can find solutions for your issues using resources from the Zapier community or the help center. This section offers guidance and support to help you troubleshoot any problems.
Ready to Automate with Zapier?
Now that you’ve got a good grasp of the fundamentals, you’re all set to give Zapier a try. And remember, if you want to dive deeper or need a bit of guidance, the Zapier Help Center is full of helpful tips and information. So, why not get started and see how Zapier can make things easier for you?