In today’s fast-paced world, smartphones have become more than just gadgets – they are like our digital companions. Did you know that, on average, people spend over 3 hours daily on their phones, checking them about 58 times? This smartphone habit presents a fantastic opportunity for businesses to connect with audiences where they are most active. Having an app for your events can be very helpful for your attendees. They can easily access essential information and stay engaged right from their devices. The good news is that you don’t need to be a tech expert to create one. With our platform, you can easily build a professional event app that will provide all the necessary details to your audience. Let’s explore how to use this tool to make your next event even more successful!
8 Essential Reasons to Have an Event App
In event planning, a mobile app can be a game-changer. Let’s look at eight reasons why it is a must-have for your next event:
- Keep Attendees Interested: An app helps people stay involved in your event with fun activities like voting and asking questions.
- Updates on the Go: If anything changes, you can tell everyone quickly through the app.
- More Opportunities for Sponsors: Sponsors can have special spots in your app. This makes them more interested in your event.
- Reduce Paper Use: By providing digital schedules, maps, and brochures, an app helps in cutting down the use of paper, making your event more eco-friendly.
- Building Community: Apps can include social features encouraging attendees to interact, share experiences, and build a community around your event.
- All Event Content in One Place: With an app, all the information about the event is easily accessible in one spot, from schedules to speaker bios.
- Feedback and Discussions: You can gather valuable feedback and encourage discussions through the app, helping you understand what attendees think and want.
- Brand Building: A well-designed app makes your brand stand out and leaves a strong impression on your attendees, improving your brand’s image.
In conclusion, an event app is the key to a smooth, eco-friendly, and impressive event. It increases participation and makes your brand stronger. It’s not just about technology—it’s about creating an engaging and unforgettable event experience.
💡 Useful Tip
Before diving into the creation of your event app, we highly recommend going through our app builder guide. This will give you a strong foundation and a clearer understanding of all the components and features of the app builder. It’s a great starting point to ensure you’re well-equipped to make the most out of the app creation process.
Important Features For Your Ultimate Event App
When making an app for your customers, picking the right features is crucial. Let’s explore the key parts that make it stand out and greatly improve the user’s experience. Each feature is carefully designed to engage, provide convenience, and ensure your app is a must-have for everyone at the event.
- Events: A feature for users to find and sign up for different events. This makes it easy for them to keep track of the events they’re interested in.
- Agenda: Shows a list of various sessions or activities available. Users can explore and add sessions of interest to their schedule, enhancing their event planning.
- News and Feeds: Keeps users up-to-date with the latest news and information about events or sessions. It ensures that users are always informed about what’s happening.
- Discussions: Allows users to engage in conversations with event speakers and organizers. This feature is great for making new connections and learning from others.
- File Manager: A convenient place to store and access important event files, like presentations and notes. This helps users easily find and use the materials they need.
- Messages: Enables users to send messages to other attendees and event organizers. This feature adds a personal touch to the event experience by facilitating direct communication.
Now that we know what features are important, let’s take a closer look at each of them. We’ll see how they work and how you can add them to your event app. Ready? Let’s get into the details!
🗒️ Note on Viewing Examples:
All the examples presented in this guide were demonstrated using the app’s published version. To make your own app live, all you need to do is click on the ‘Publish’ button in the top menu of the app builder. Once you have published your app, you can see and test its features as they appear to your users.

Events
Starting with the basics, setting up your ‘Events’ feature is simple. Here’s how you can get it done:
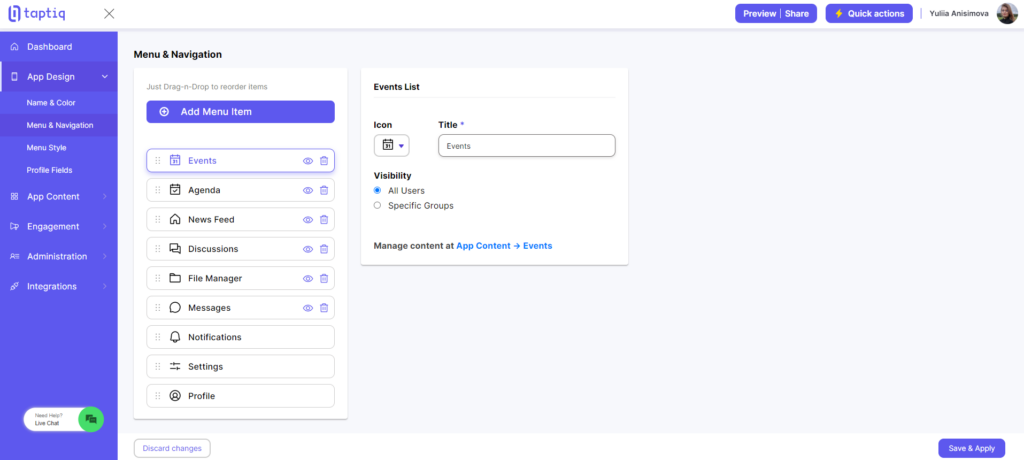
- Start in App Design: Go to the App Design section. This is where you change the app’s look and functionality.
- Menu & Navigation: Inside App Design, you’ll find Menu & Navigation. This is where you control what items appear in your app’s menu.
- Pick ‘Events’ from the Menu: Look for Events in the list of menu options and select it. This step lets you adjust settings specifically for this item.
- Customize Title and Icon: Change the name and pick an icon for the Events item. This helps it stand out and fit the theme of your app.
- Control Who Sees It: Decide who gets to see the Events menu item. If it’s meant for certain users, you can make it visible only to them.
Next, let’s focus on how to handle your events in the app. We’ll look at updating and creating new events, covering what information to include and how to present it effectively to your users.
Adding New Events
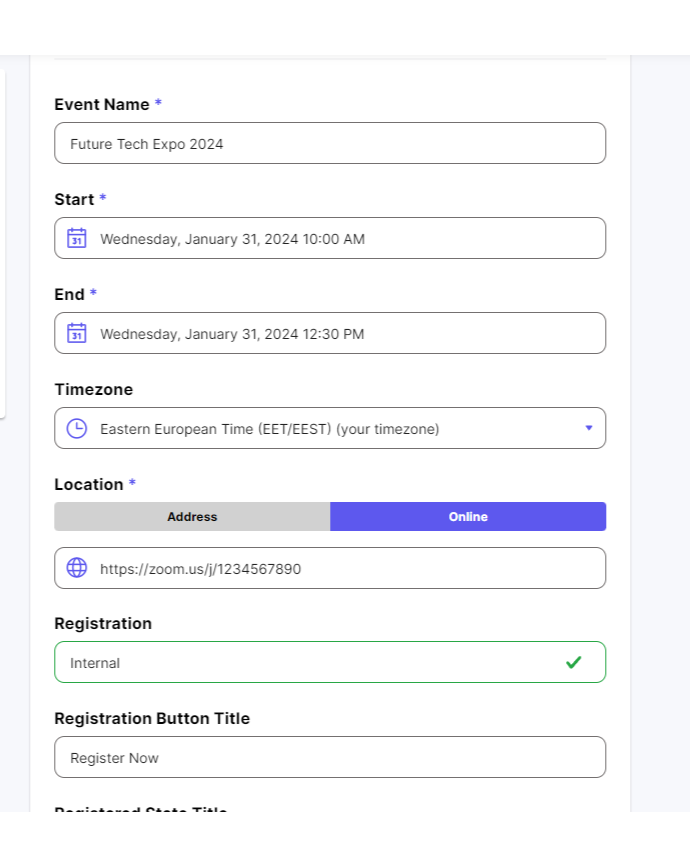
Go to ‘App Content’, then choose ‘Events’. Press the ‘Add New Event’ button to create a new event.
Fill in General Information:
- Event Name: Enter the name of your event.
- Dates and Timezone: Choose the start and end dates and set the timezone.
- Location: For offline events, give the address. For online events, include a link.
- Type of Registration: Internal (register through the app), external (a link to another resource where users can register), and disabled.
- Registration Button and State Title: Customize the text for your registration button and the status message.
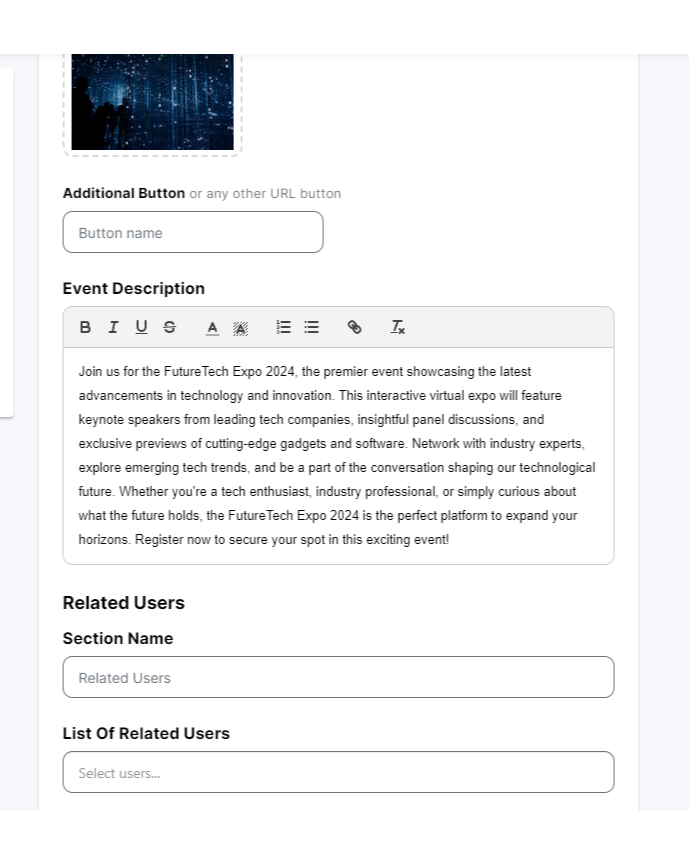
- Additional Button: If you need to include a link to another URL, such as more information or related activities, use this button.
- Description: Write a detailed description of your event.
- Related Users: Specify any users related to the event, like speakers or organizers.
- Send Push Notification: Use this feature to create and send a notification about the event to your app users. This is a great way to alert users about new events or important updates.
Now that you’ve entered the basic info and decided to publish or save your event as a draft, let’s add more details to your event. Here are the ways to do this:
- If Sending a Push Notification: Choosing to send a push notification first will redirect you to the notification section. To add more information to your event after this, go back and select the ‘View’ option for your event, and then edit.
- If Not Sending a Push Notification: If you decide not to send a push notification and instead directly publish or save the event as a draft, you’ll automatically go to the section where you can add additional information.
Either way, this step helps make your event more interesting and gives your attendees all the information they need.
Agenda:
- Use Menu Module: You can add an agenda from sessions you’ve already put in ‘App Content’ -> ‘Agenda’ (we’ll cover how to make these sessions later).
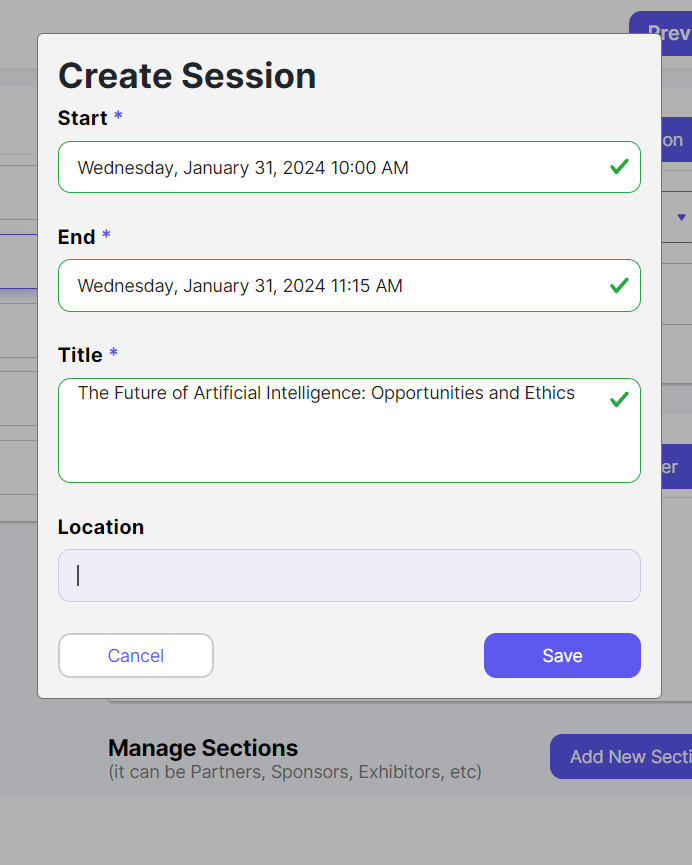
- Use Internal Sessions: Alternatively, you can create sessions that are unique to this event. To do this, click ‘Add New Session’, and then fill in the start/end dates, title, and, the location for each session (optionally).
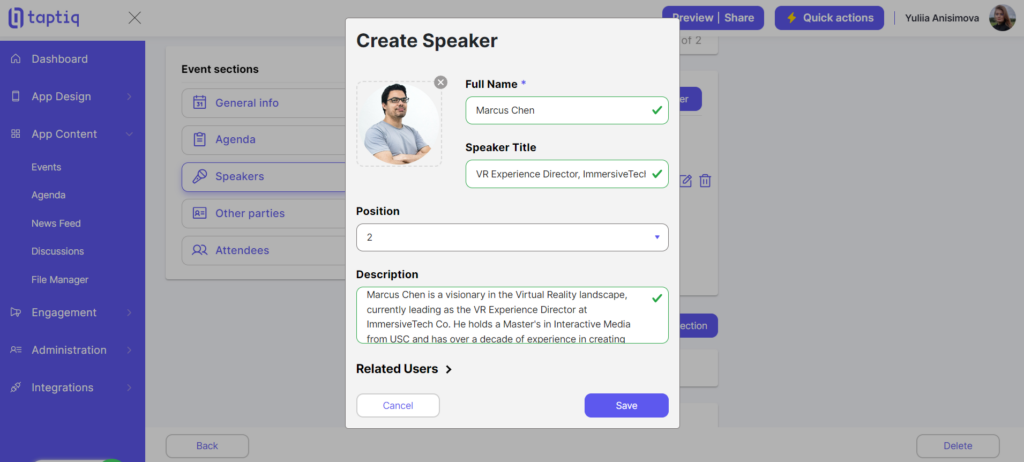
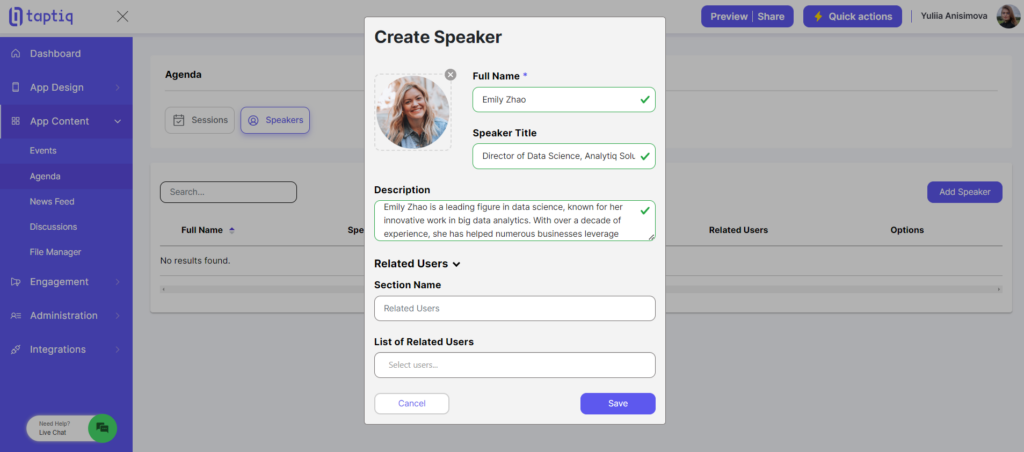
Speakers:
- Go to ‘Speakers’: Find ‘Speakers’ on the left menu.
- Add Speaker: Click the ‘Add Speaker’ button.
- Fill in Details: Enter the speaker’s name, job title, and a short description.
- Upload Photo: Put in a photo of the speaker.
- Set Speaker’s Position: Choose where the speaker appears in your speaker list, like 1st, 2nd, and so on.
- Connect to Others: If needed, link the speaker to related people in the event.
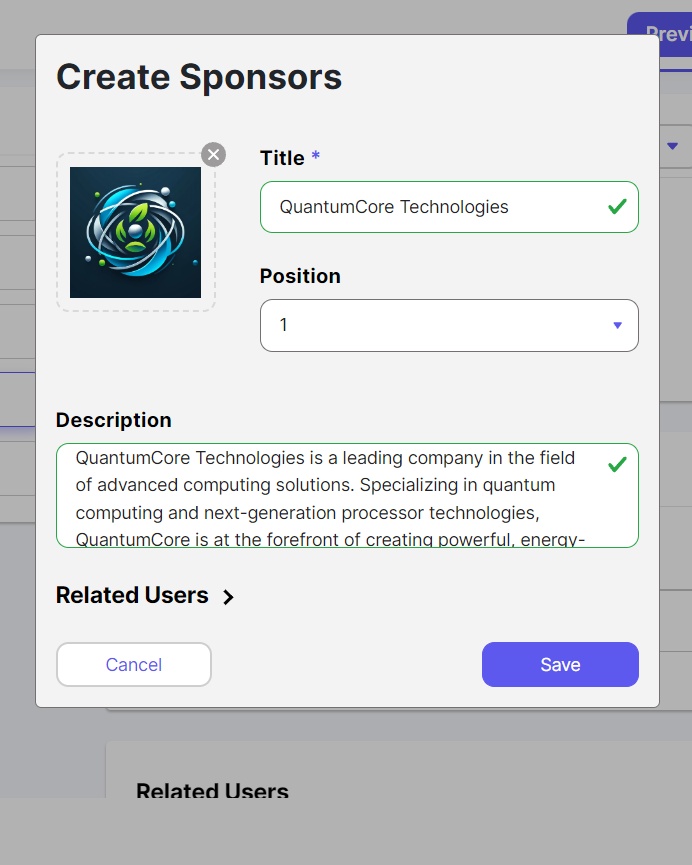
Other parties:
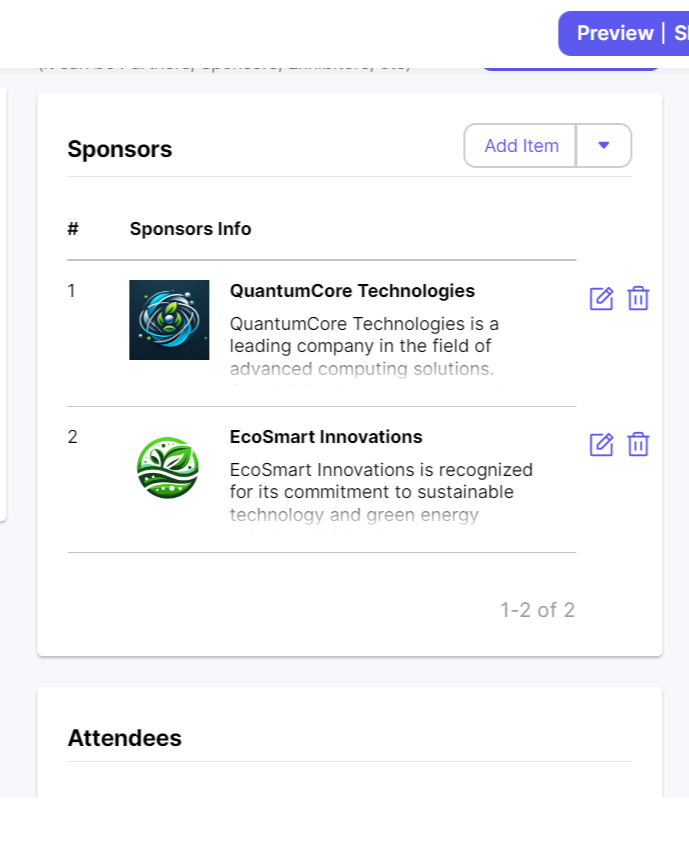
You can create special sections for things like sponsors, partners, and others. You do this in the ‘Other Parties’.
- Go to ‘Other Parties’.
- Start a New Section: Click ‘Add New Section’ to make a new area for sponsors, partners, etc.
- Name the Section: Name this section as ‘Sponsors’ or ‘Partners’.
- Add Details: For each one, put in their name, their place in the list, a short description, a logo or picture, and a link to related people (optionally).
Attendees:
Here, you can see a list of users who have registered, as well as related users you’ve mentioned in previous sections. This feature makes it easy to keep an eye on attendee numbers and stay connected with key participants involved in your event.

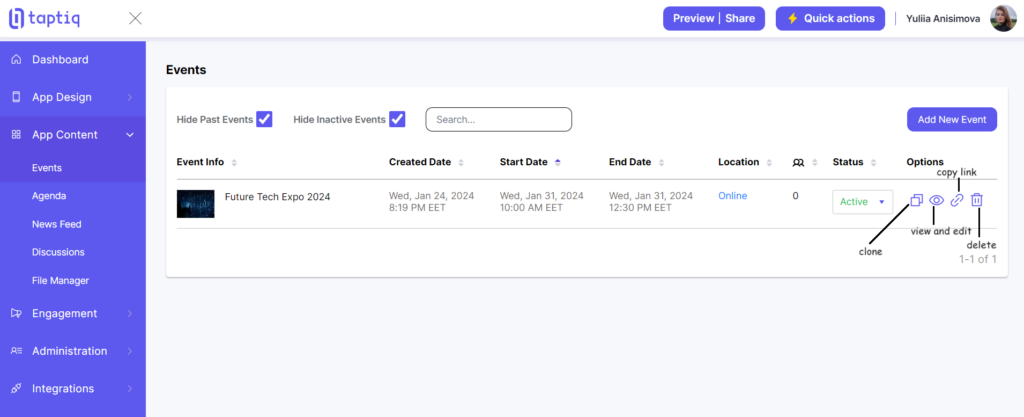
Managing Existing Events
- Finding Your Events: Navigate to ‘App Content’ and then select ‘Events’ to see a list of your events.
- Understanding Event Details: In this section, you’ll see important information about each event, like the created date, its start and end dates, location, how many people have registered, and the current status of the event.
- Changing Event Status: You can switch between ‘Active’, ‘Inactive’, or ‘Draft’, depending on if the event is coming soon, not being used right now, or still being planned.
- Event Cloning: If an event will happen again later, you can ‘Clone’ it. This makes a new event like the old one, saving you time.
- Viewing and Editing Events: Select ‘View’ to open an event and see all its details. Here, you can also edit the event to update any information.
- Copying Event Link and Removing Events: For easy sharing, you can copy the event link. If you don’t need the event anymore, you can remove it.
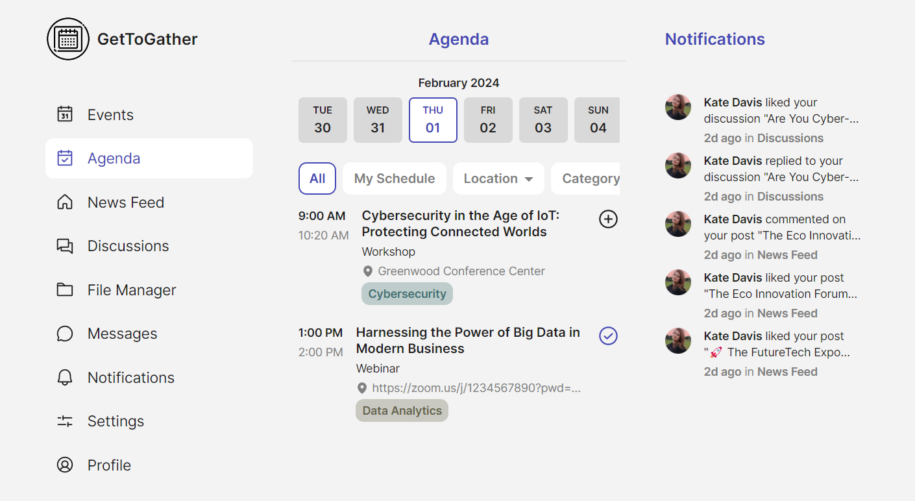
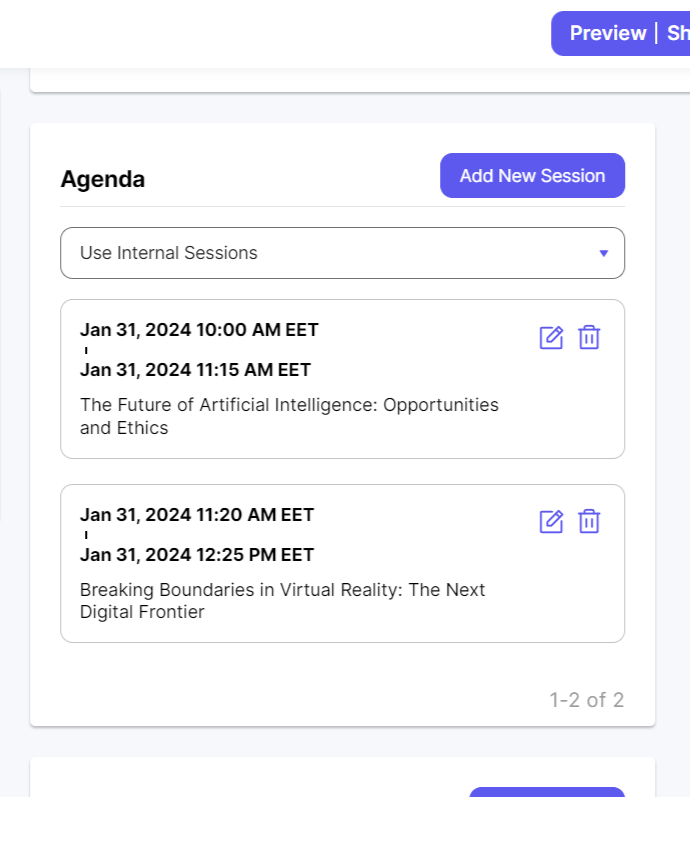
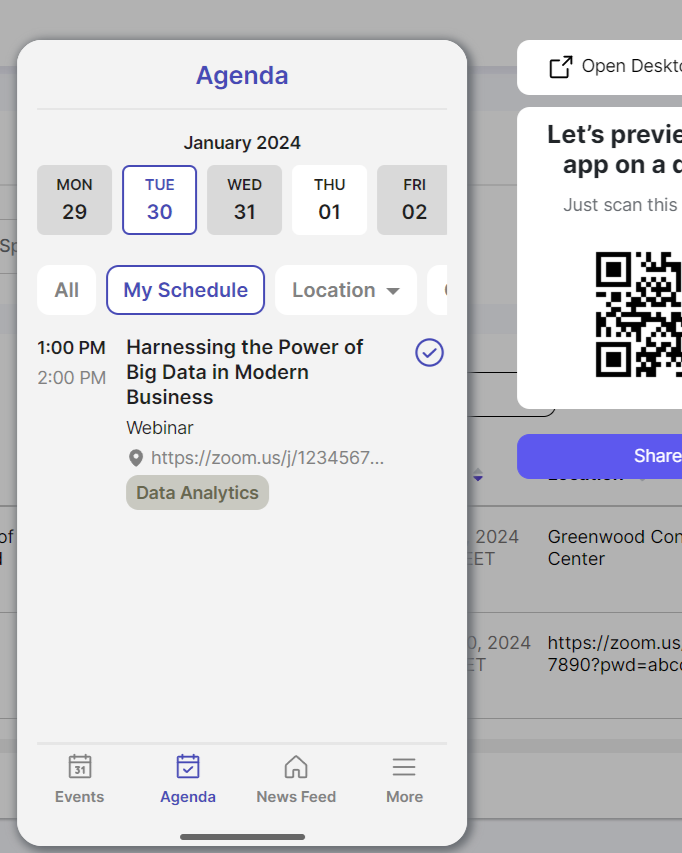
Agenda
Now let’s take a closer look at the Agenda section. This part of your app offers flexibility in how you create and manage sessions. You can approach the Agenda in two different ways:
- Link Sessions to Specific Event: Start by creating sessions. Once they’re ready, link them to the event they belong to. Navigate to the chosen event, click ‘View’, then go to ‘Agenda’, and select ‘Use Menu Module’.
- Create Independent Sessions: Alternatively, you can set up sessions independently. This option doesn’t tie them to any specific event, making it perfect for more general sessions.
Each way of setting up your agenda has its benefits, so you can pick what works best for your event and the attendees. Next, we’re going to talk about how to add speakers and sessions, and how to keep everything running smoothly. It will help make sure your event is enjoyable and well-planned for everyone.
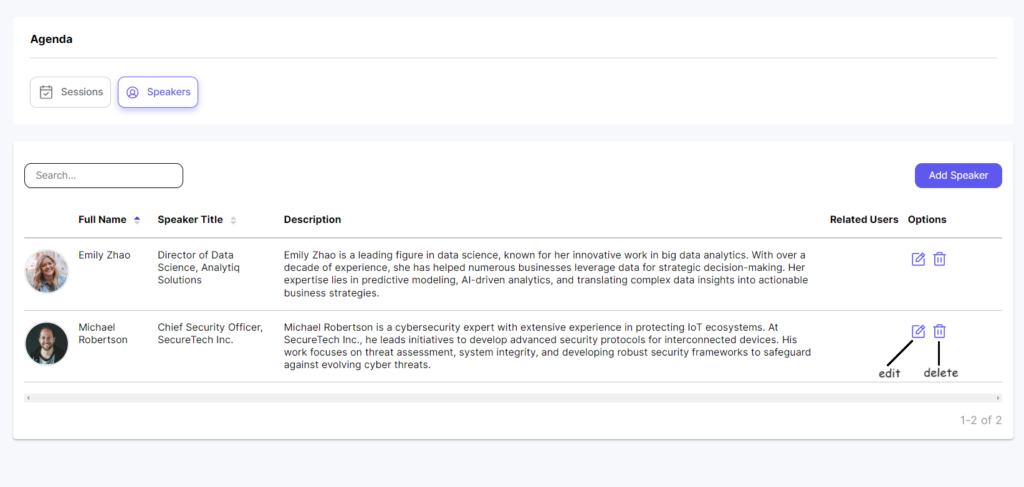
Speakers
Now, let’s see how to add speakers:
- Go to Speakers.
- Click ‘Add Speaker’ to create a new speaker.
- Fill in Their Info: Add the speaker’s photo, name, job title, and description. You can also add related users, like co-speakers or team members.
After adding speakers, it’s easy to keep their info up to date. Go to the ‘Speakers’ section if you need to change anything, like the description, or delete the speaker.
Sessions
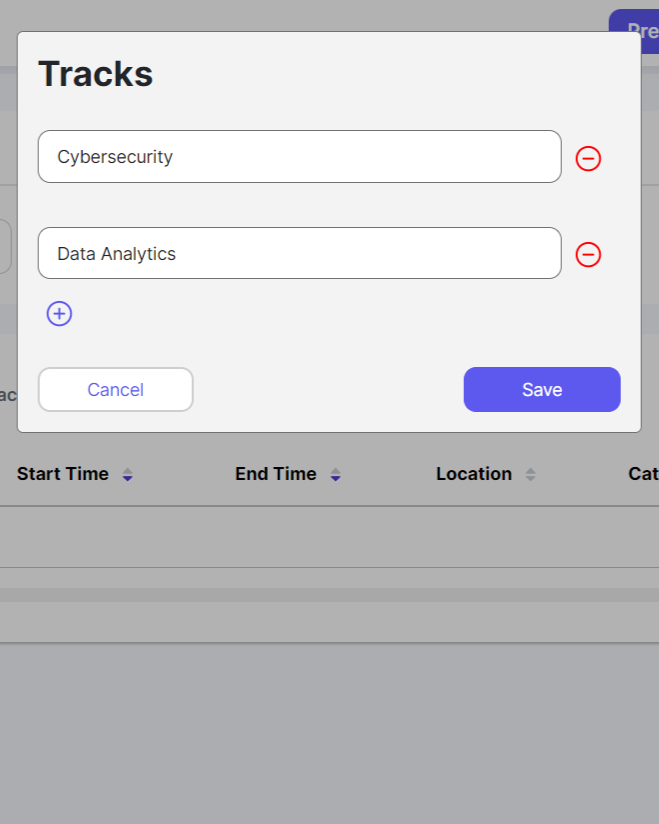
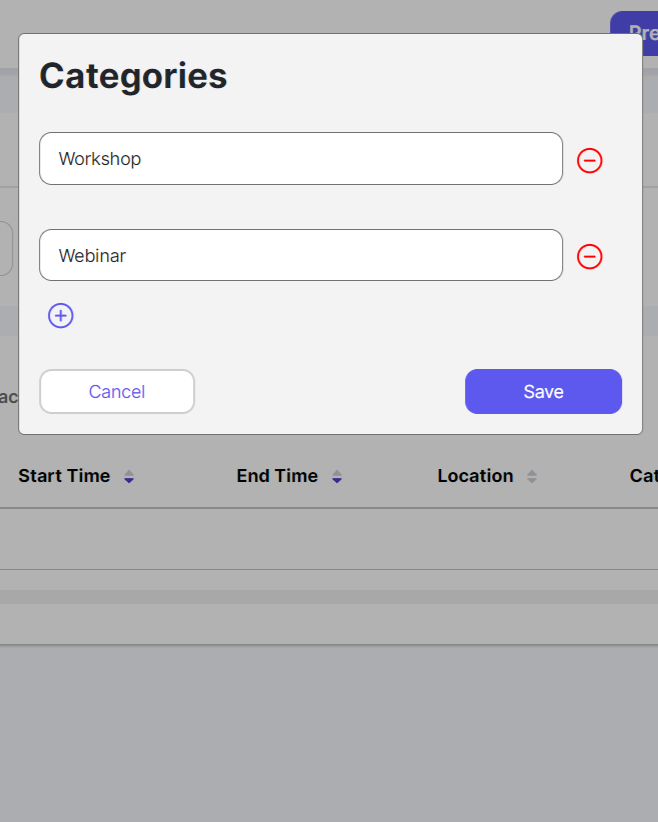
Next, let’s talk about putting sessions into the Agenda. You can organize these sessions in two ways: with tracks and categories. Tracks organize sessions by topic, while categories sort them by the type of activity.
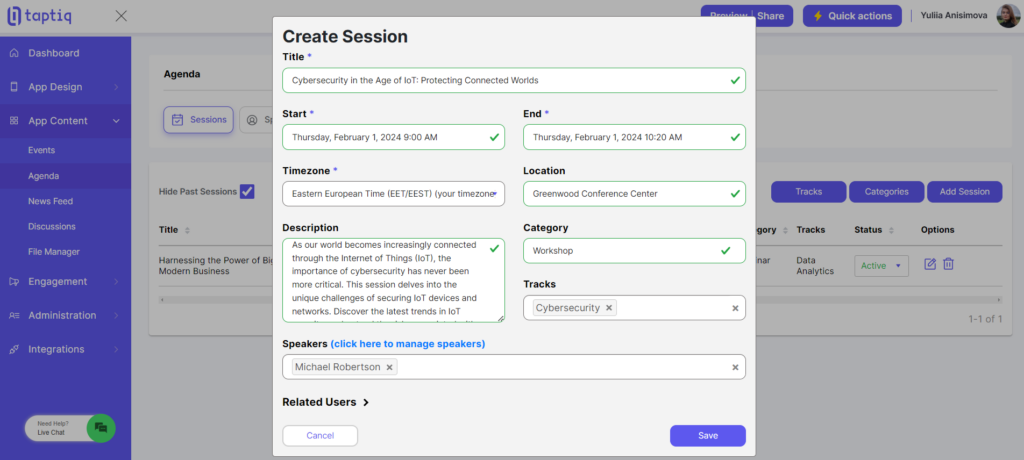
Creating a New Session:
- Click on the ‘Add Session’ button to begin.
- Title Your Session: Give your session a clear and descriptive title.
- Set the Date and Time: Choose the start and end date for the session, and don’t forget to set the correct timezone.
- Specify the Location: For offline sessions, provide an address. If it’s an online session, include the link where attendees can join.
- Select Category and Track: Assign the session to a category and the relevant track(s). This helps attendees find sessions that match their interests.
- Add a Description: Write a brief but informative description of what the session is about.
- Include Speakers: Add the names of any speakers who will be presenting or leading the session.
- Add Related Users: If there are other users related to this session, like co-hosts, add them here.
Managing sessions is easy after adding them. You can change the status, edit details, or remove them. With the Agenda set up, we’re ready for the next step in your event app.
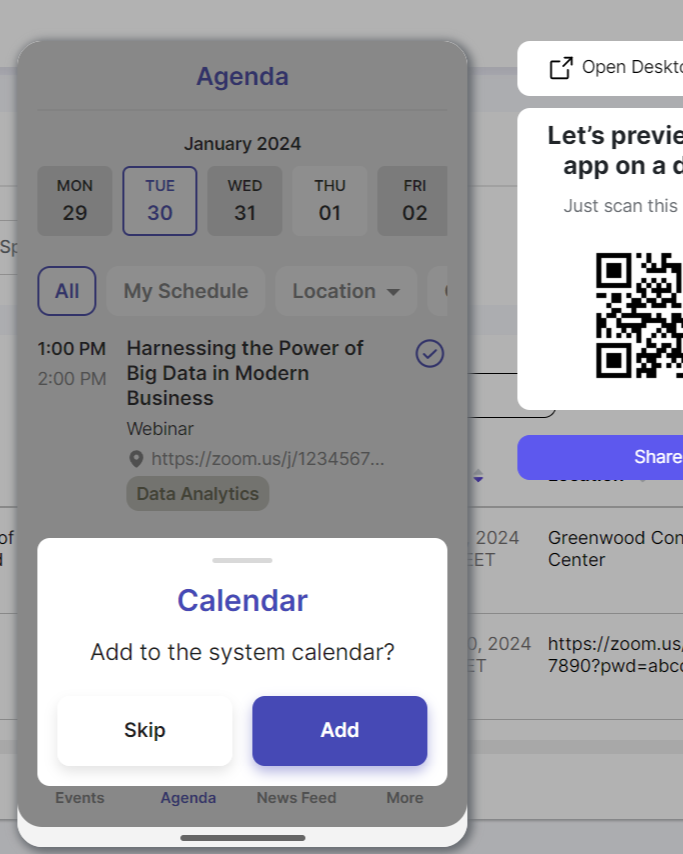
Event attendees can easily browse through and add the sessions they are interested in to their personal schedule. Additionally, they can export these sessions to external calendars, such as Google Calendar. This feature lets them see the event sessions along with their other plans, making the whole event experience better for them.
News Feed
The News Feed in your app is a great place to talk about your events. You can write posts about events that are coming soon or ones that have already happened. It’s great for getting people excited about future events and showing off the fun things that happened at past ones.
Here are some tips on how you can engage and connect with your audience:
- Post Updates: Keep your audience informed about upcoming events by sharing details such as dates, speakers, or special announcements.
- Recap Events: After an event, share how it went and add photos to give attendees a chance to relive the experience and show others what they missed.
- Engage with Polls: Create interactive polls to get feedback or engage with your audience. It’s a fun way to keep attendees involved and interested.
Using the News Feed is a great way to keep everyone in your event community in the loop and make your app more fun and interactive.
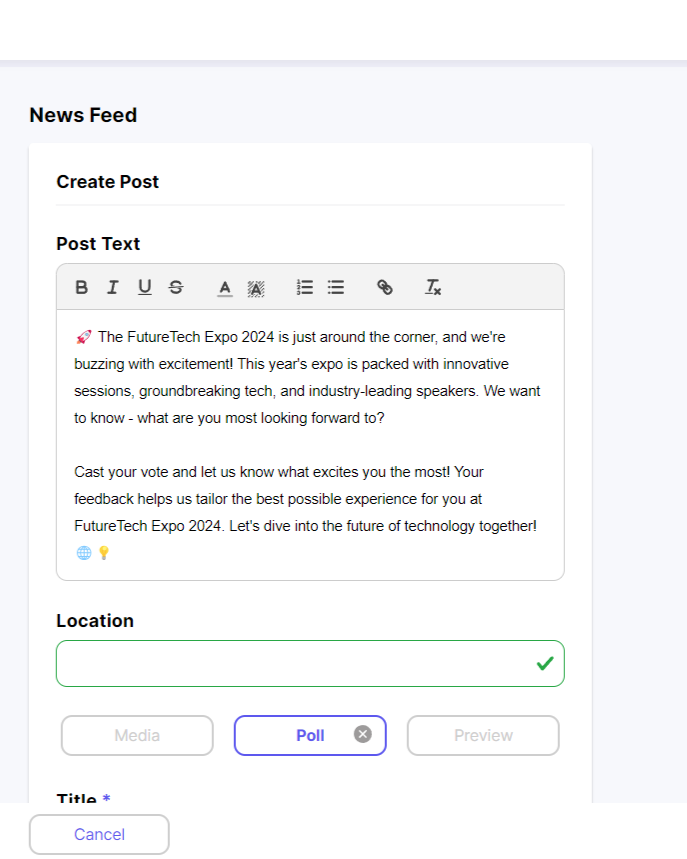
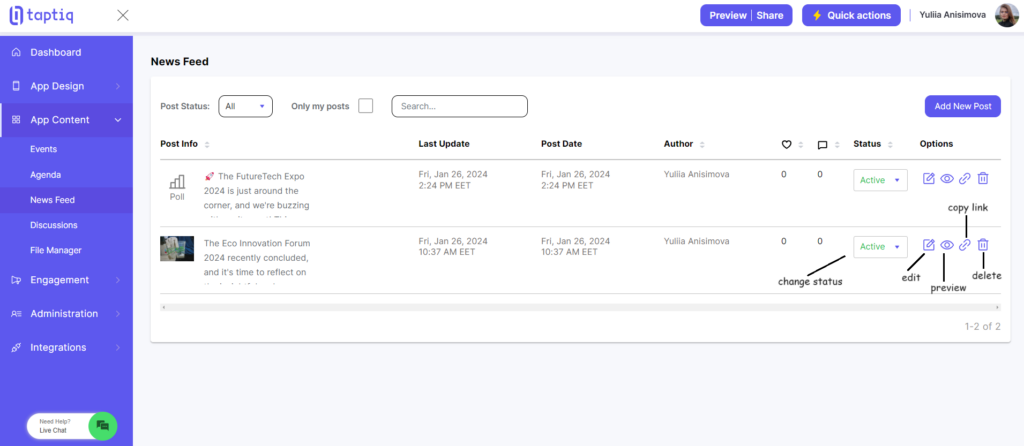
Creating a New Post:
- Click on the ‘Add New Post’ button to begin.
- Write Your Post: Type in the text for your post. You have options to make your text stand out – like making words bold or italic, or organizing your text into a list.
- Add a Location: You can include the location where your post is focused.
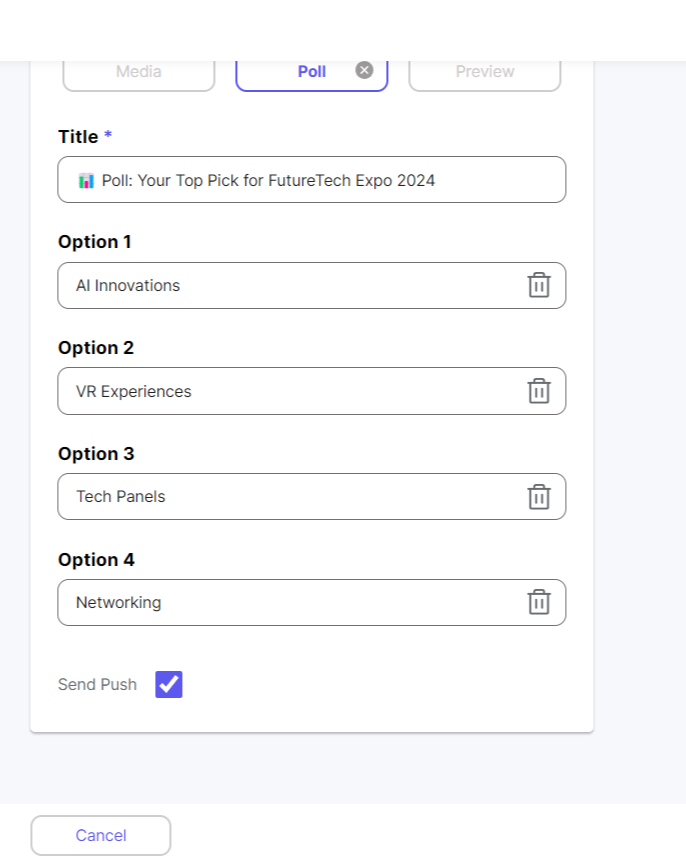
- Upload Media or Add a Poll: Make your post more engaging by uploading up to 10 images or add a poll to interact with your audience. If you add a poll, remember to keep each option under 25 characters.
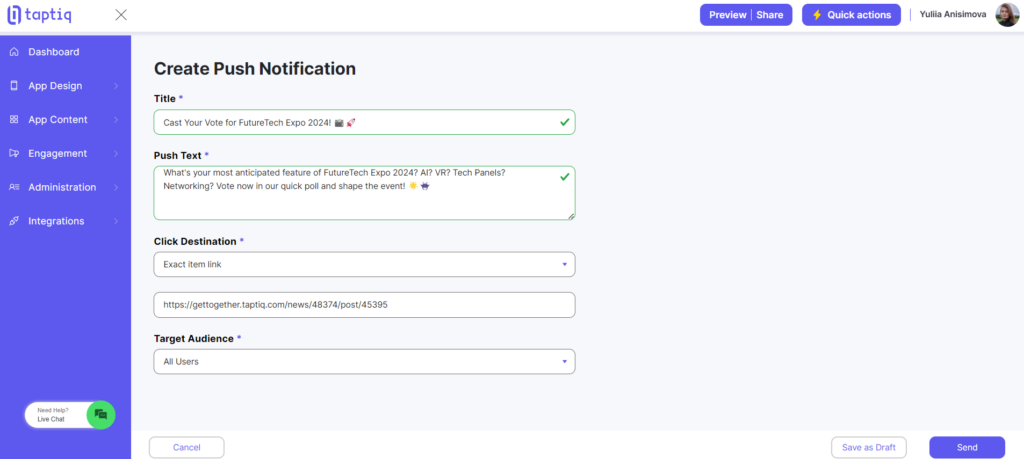
- Send a Push Notification: If you want to alert users about this new post, you can choose to send a push notification. After you publish or save your post, you can write a title and some text for the notification. This is to make sure it shows the main point of your post and gets your audience’s attention.
Once you have posts in your News Feed, managing them is simple. Here’s what you can do with your existing posts:
- Edit: If you need to change something in your post, you can easily edit it. This helps update information or correct any mistakes.
- Preview in App: If your app is already published, you have the option to preview how the post looks in the app. This helps you see exactly what your audience will see.
- Copy Link: You can copy the link to your post. This is useful for sharing it in other places, like emails or on social media.
- Delete: If a post is no longer needed or relevant, you can delete it to keep your News Feed up-to-date.
We’ve covered everything you need to know about managing the News Feed, from creating engaging posts to keeping them up-to-date. Next, let’s talk about Discussions in your app. This part is great for starting chats and building a community feel.
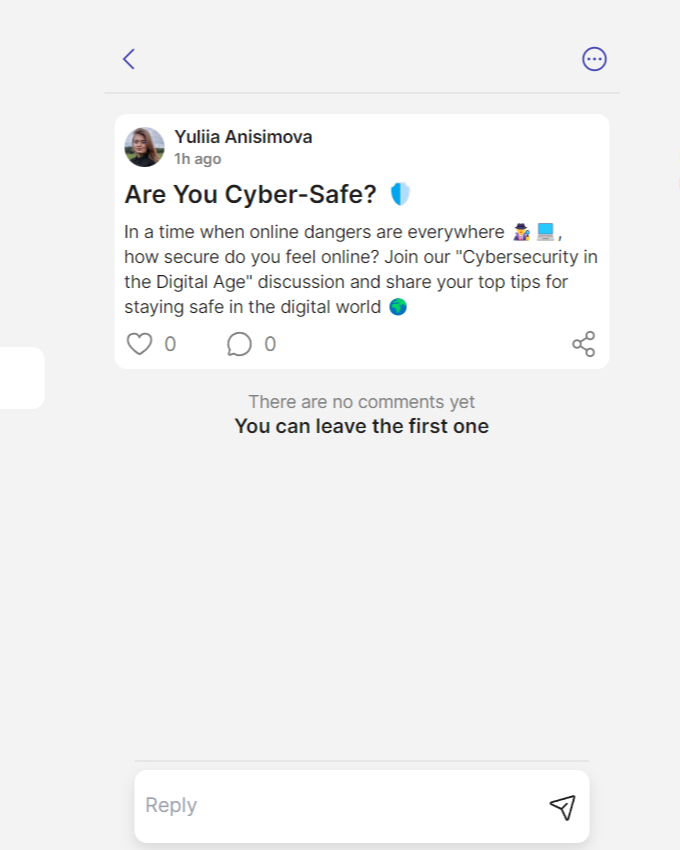
Discussions
Discussions in your app are important because they let people talk and share ideas, making your app more lively and community-oriented. In this feature, you set up categories for different discussions, but the actual posts are made by users directly in the app.
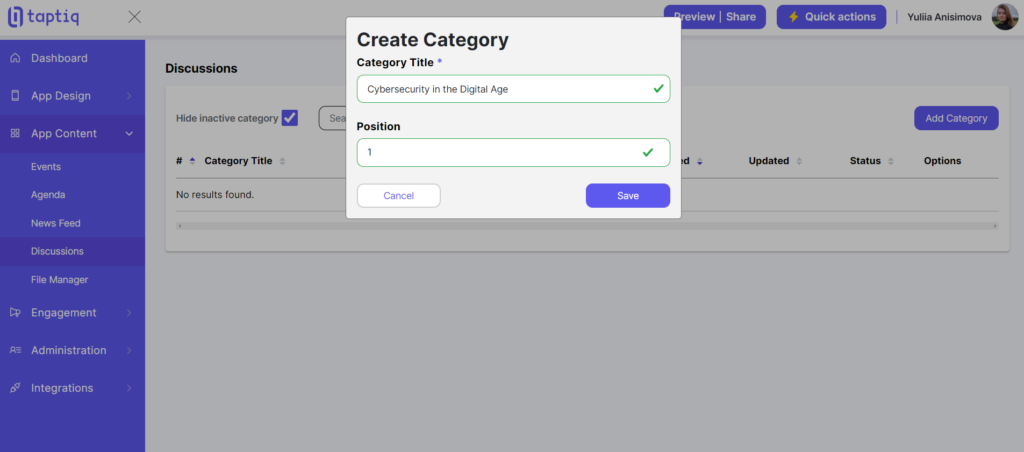
Creating a Discussion Category:
- Click ‘Add Category’ to start.
- Name Your Category: Choose a title for your discussion category.
- Organize Your List: Decide where this category should appear among others.
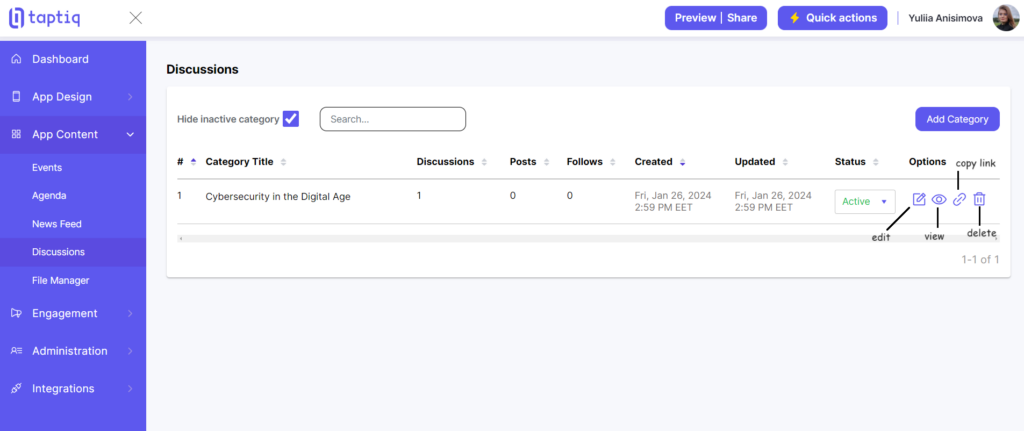
Managing Existing Categories:
- Edit Details: Update the name or position of your categories as needed.
- View Posts: Check what users are discussing within each category.
- Copy Link: Share a category outside the app with its link.
- Delete: Remove any category that’s no longer relevant.
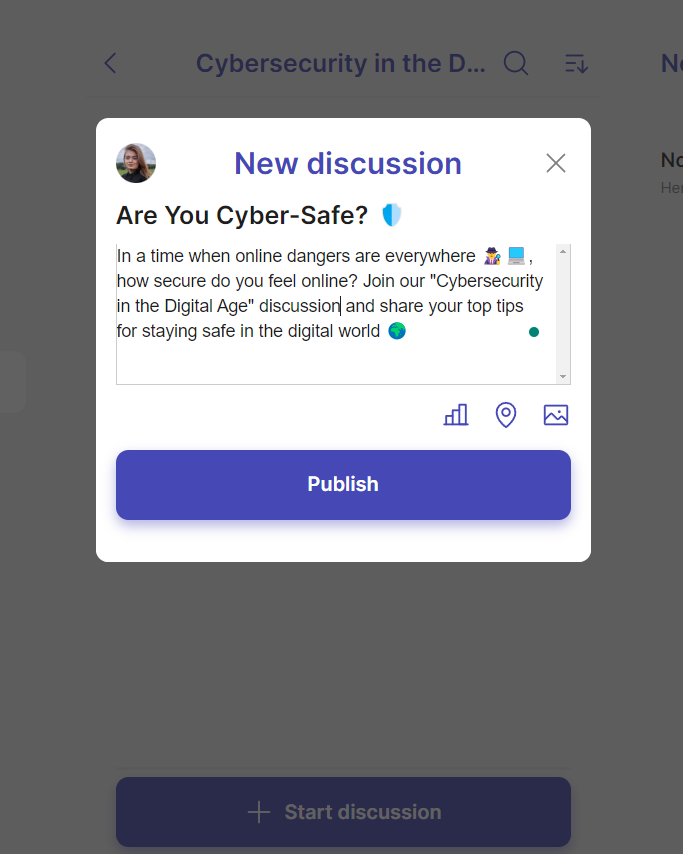
To start a discussion in your app follow these steps:
- Go to Your App: Open your app and navigate to the Discussions section.
- Select a Category: Choose the category where you want to start a new discussion. This helps in keeping discussions organized and topic-specific.
- Start a Discussion: Click on ‘Start Discussion’ within your chosen category.
- Create Your Discussion: Start by giving your discussion a clear title. Then write what you want to talk about. You can add a place if it’s important for your discussion. To make it more interesting, you can put in a poll for people to answer or add pictures.
We’ve covered everything about Discussions in your app, setting the stage for lively and engaging conversations among your users. Next, we move to the last but not least feature: the File Manager. This tool is crucial for organizing and sharing various event-related documents and materials.
File Manager
The File Manager is really important in your app because it’s where you keep all your event files. It helps you and the attendees find things like presentations and schedules easily. You can store different things here, like slides for talks, PDFs, or pictures.
- Make Folders: You can use folders to organize your files based on speakers, events, or any other category you choose.
- Add File Links: If you have files that are stored in other apps or services, you can still include them in your File Manager by adding links to them. This is a great way to share files with others without having to upload them to your app.
- Upload Files: You can upload files directly to your File Manager, which will make them available to everyone who has access to your app. For example, you can upload event plans, speaker slides, or any other important files.
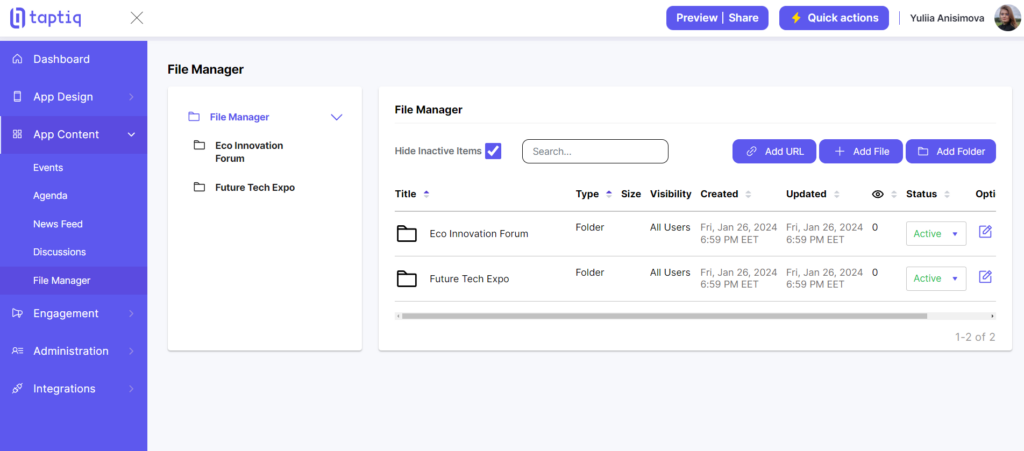
With the File Manager, you can make sure everyone has what they need for the event, all in one place.
Your Journey to an Amazing Event App Begins Here
You’ve successfully set up your event app with all the key features – from lively discussions to detailed agendas and organized files. But this is just your starting point. As you get more familiar with the app, feel free to explore and add new features to make it even better.
Turn Your Ideas into Reality – Click Here!
Check out the video below! It shows how the app looks and works from a user’s point of view. It’s a great way to see your app through your attendees’ eyes and to get ideas for more improvements. Good luck, and enjoy making your event app stand out!